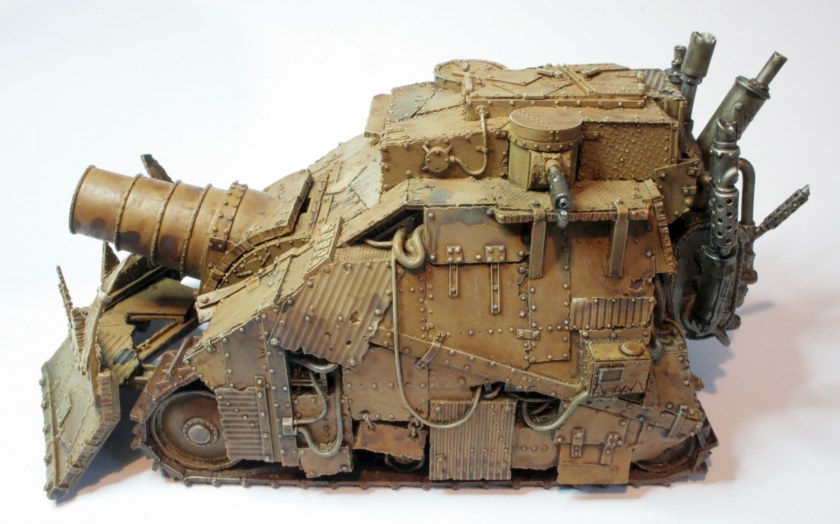
Getting there with my Grot tanks…

I picked up a set of Grot Tanks on a visit to Warhammer World. Having not really looked at them for a while, having been stuck at the undercoated stage, I thought I might try and finish them and I blogged about this earlier.

The set contains four different variant chassis, tracks, exhausts and turrets as well as four fantastic Grot Tank Kommandaz and 5 different, incredibly shooty, weapon options.

I had given Grot Tank II a base coat of Chieftain Green but painted the tracks with Gorthor Brown and the exhausts with Leadbelcher. I then gave the model various washes of mainly Citadel Shades, Seraphim Sepia, though for some parts of the model, basically the tracks and the engine, I used Agrax Earthshade. I also used Nuln Oil for various metallic parts of the model.

I did the tracks on the Grot Tank IV with Gorthor Brown. I then painted the exhausts with Leadbelcher. As with the other tank I gave the tracks and exhausts various washes.

The model’s main hull and turret was given a basecoat of Ushabti Bone, before  I gave the model a wash of Seraphim Sepia. Continue reading “Getting there with my Grot tanks…”

Painting the Aeronautica Imperialis Valkyrie Assault Carriers

I have finished painting my Aeronautica Imperialis Valkyrie Assault Carriers.

Typically seconded to the Astra Militarum, Valkyrie Assault Carriers deliver troops directly to the front, hovering in place to provide fire support, before blasting off to take on enemy aircraft. Versatile weapon hard points allow them to be kitted out to take on a wide range of ground targets and aircraft.

I had the boxed set of the Aeronautica Imperialis Valkyrie Assault Carriers, which I constructed and gave a white undercoat.

The models were then given a basecoat of Ushabti Bone. I wanted a lighter colour, knowing that when I shaded the models it would darken the basecoat.


I am not particularly happy about painting camouflage, but decided I would have an attempt on these models, partly to push myself in terms of painting, but also to make them look different to the Imperial Navy and Ork models I had painted. I also quite liked the scheme that was used on the GW models.

Now I am pretty sure they used an airbrush on their models, but I didn’t have an airbrush!

I used a stipple brush and Castellan Green to add the green camouflage. I made my stipple brush by cutting the bristles down on a normal brush to around 3-5mm. I didn’t want marked and clear camouflage, more of a stippled or airbrushed look. Paint is added to the brush and then I try and remove some (not so little as with drybrushing) but enough for coverage.

I quite like the effect and I think when shaded this will tone it down as well. Continue reading “Painting the Aeronautica Imperialis Valkyrie Assault Carriers”

Building the Aeronautica Imperialis Valkyrie Assault Carriers

Typically seconded to the Astra Militarum, Valkyrie Assault Carriers deliver troops directly to the front, hovering in place to provide fire support, before blasting off to take on enemy aircraft. Versatile weapon hard points allow them to be kitted out to take on a wide range of ground targets and aircraft.

I pre-ordered the boxed set of the Aeronautica Imperialis Valkyrie Assault Carriers.

These are quite fiddly models to make. There are quite a few small parts, such as the top of the cockpit and the engines. The rear tail assembly is also a bit of a challenge.

You need to ensure you have cleaned the pieces so that they fit neatly together, otherwise you will get gaps. Here are the four finished models on my workbench. I built two as Valkyrie Assault flyers and two as Vendetta Assault Carriers. The main difference between two flyers are the underwing ordnance.

Having constructed the models I gave them a white undercoat, using a white spray paint.

There are two versions you can build, the Valkyrie Assault Carrier with rocket pods or the Vendetta Assault Carriers with Lascannons.

See the Aeronautica Imperialis Valkyrie Assault Carriers workbench.

Getting some more done with those Grot Tanks

I picked up a set of Grot Tanks on a visit to Warhammer World. Having not really looked at them for a while, having been stuck at the undercoated stage, I thought I might try and finish them.

The set contains four different variant chassis, tracks, exhausts and turrets as well as four fantastic Grot Tank Kommandaz and 5 different, incredibly shooty, weapon options.

I had worked on one tank first, but have now started on the others.

With Grot Tank I I painted the tracks with Gorthor Brown. I then painted the exhausts with Leadbelcher.

I had already given Grot Tank II a base coat of Chieftain Green but then started to paint the tracks with Gorthor Brown. I then painted the exhausts with Leadbelcher.

I also used the same paint to paint the Grotzooka ammo box and the Grotzooka ammo in the cannon.

Having worked quite a bit on Grot Tank III I am now quite pleased with how it turned out.

Though I think I will need to fix that track, so it’s out with the green stuff.

I painted the tracks with Gorthor Brown. When I did this I actually noted in the workbench page that I had used Dryad Bark, which is a much darker colour. It was only when painted the other Grot Tanks that I realised I hadn’t used Dryad Bark and must have used Gorthor Brown. The whole point of these guides is they should help me paint! Anyway I was pleased with the way the Gorthor Brown tracks now look. So I had to repaint some of the other tanks.

I did the tracks on the Grot Tank IV with Gorthor Brown. I then painted the exhausts with Leadbelcher.

See the workbench features on the Grot Tanks.


Basecoating and shading the Inquisitorial Achilles Ridgerunner

One of my more recent models is the Genestealer Cults Achilles Ridgerunner.

The Achilles Ridgerunner is an Imperial light exploratory vehicle often used to scout out new ore seams by mining guild prospectors and newly discovered terrain on Frontier Worlds by geological surveyors.

I really do like this model, and as it is an Imperial light exploratory vehicle, I decided that I could use this to support my Daemonhunters force of Inquisitorial Stormtroopers, some of whom are Cadian Kasrkin and some are Tallarn Imperial Guard.

I had already constructed and undercoated the model.

So the next stage was the basecoat.

I would like to have used a Foundation paint, Tausept Ochre, which I have used on my other Inquisitorial vehicles, however Citadel have not made that for a few years. Checking a paint conversion chart, I bought some Balor Brown.

To be honest Balor Brown, though similar in colour is no Tausept Ochre!

It certainly didn’t cover the model in the same way, so much so that in some areas I had to apply a second coat. However the shade looks right, so I was happy with that.

Using Abaddon Black I painted up the underneath where the white spray had “leaked” onto the black, or where the black spray hadn’t covered.

The model was then given various washes of mainly Citadel Shades, Seraphim Sepia, though for some parts of the model, basically therear decks, I used Agrax Earthshade.

See the workbench feature on the Inquisitorial Achilles Ridgerunner.

Building and undercoating the Inquisitorial Achilles Ridgerunner

One of my more recent models is the Genestealer Cults Achilles Ridgerunner.

The Achilles Ridgerunner is an Imperial light exploratory vehicle often used to scout out new ore seams by mining guild prospectors and newly discovered terrain on Frontier Worlds by geological surveyors.

I really do like this model, and as it is an Imperial light exploratory vehicle, I decided that I could use this to support my Daemonhunters force of Inquisitorial Stormtroopers, some of whom are Cadian Kasrkin and some are Tallarn Imperial Guard.

It comes in an A5 sized box with two sprues. One consist of the main body and chassis.

The other sprue is the wheels, crew and weaponry.

As some of my forces are inducted Tallarn Imperial Guard, I am going to see if there are any models I could use, otherwise I will build it as locked down. I won’t use the included crew as they are Genestealer Cults troops and they have Genestealer traits…

I started to build the model. Continue reading “Building and undercoating the Inquisitorial Achilles Ridgerunner”

Painting a Killa Kan

Killa Kans are smallish, bipedal walkers composed of a rickety, lightly armoured “kan” perched atop a pair of piston driven legs, and armed with a selection of ranged and close-combat weapons. Relatively primitive and weak by Ork standards, they are nonetheless fast and incredibly dangerous for their size, and one or two are more than a match for an Astra Militarum Sentinel walker.

These plastic Killa Kans were a christmas present many years ago…

The box provides for a mob of three plastic models all armed with different weapons.

In the box you get three plastic sprues, which allow you to make three plastic Killa Kan.

The last time I looked at these I had given them a wash of Devlan Mud, which is now no longer available… however a quick search means I can find alternatives.

I decided I might try and finish the models, however one of them had broken it’s buzzsaw. So that one was picked as one to try and finish first. Having fixed the buzzsaw I painted some parts of the model with Leadbelcher paint including the main saw.

I did some dry brushing of the model.

See the workbench feature on all three Killa Kans.

Having another go at that tank

that tank from Indiana Jones

Probably my favourite Indiana Jones film is Indiana Jones and the Last Crusade. The combination of archaeology, mythology, nazi soldiers and lots of wonderful pulp action. Though we know it wasn’t real, and though we know that there was no actual historical version of it; I am sure most of us who have thought about recreating the Indiana Jones films on the table have wanted to use that tank.

It appears at first glance to be a Mark VIII with a turret, the reality was that it was built specially for the film and was built up from an excavator.

Mechanical effects supervisor George Gibbs said this movie was the most difficult one of his career. He visited a museum to negotiate renting a small French World War I tank, but decided he wanted to make one. The tank was based on the tank Mark VIII, which was thirty-six feet (eleven meters) long, and weighed twenty-five tons. Gibbs built the tank from steel, rather than aluminum or fiberglass, because it would allow the realistically suspensionless vehicle to endure the rocky surfaces. Unlike its historical counterpart, which had only the two side guns, the tank had a turret gun added as well. 

I wrote back in 2012 about finding a 28mm model of the tank, since then I found it was available from Empress Miniatures, I was able to order it and go through the resin pieces and constructing the Mark IX Beast.

Following the application of the white undercoat, I started the base coat of Vallejo 70912 Tan Yellow on the Mark IX Beast tank.

I decided, looking at the source material that this colour was too dark, especially as I wanted to wash it with a shade or ink. So I took it back to the garage and gave it a spray of white to cover the basecoat and provide a lighter base for a sandstone or light brown colour.

As for the new base coat,I did consider using a Flames of War German Camo Beige 821 which looks like it might work.

In the end I decided to use a Citadel Layer colour, Ushabti Bone.

This I was much more impressed with as a base colour, so I finished the entire tank with this paint.

See the full workbench feature on the Mark IX Beast tank.

Painting the Big Zzappa

I have been digging through my workbench models and realised I had a fair few Forge World Ork Weapons.

I have the Big Zzappa.

Zzap weapons are a special type of weapon exclusive to the technical knowledge of the Orks. They are roughly analogous to Ork laser weapons, however describing them as lasers is a bit of a stretch. In a weird way, they share more in common to the Imperium’s lightning gun (a special type of las weaponry that causes electrical aftershocks) than tried and true laser. However, it could be deemed that the Zzap weapons uses some kind electromagnetic beams to mimic a laser.

The Big Zzappa is a heavier and more potent version of the Zzap Gun that shares its advantages, has longer range and is even more unpredictable when fired. It is mounted on heavier Ork vehicles such as Gunwagons, Big Trakks or Battle Fortresses.

I would usually paint this black and then drybrush, but I am now thinking I might more go along the same technique I used on my Ork Fight Bommer jet engine.

I have both volumes of the Forge World Masterclass books and they are a real inspiration and full of ideas and techniques for painting and weathering models. I wanted to try and emulate some of those techniques on the engine of the Ork Bommer.

I decided that I would paint the Big Zzappa with Leadbelcher, now that Boltgun Metal is no longer available. Continue reading “Painting the Big Zzappa”

KillKannon Grot Krew

I have been digging through my workbench models and realised I had a fair few Forge World Ork Weapons.

One model I have purchased was an Ork KilKannon. I am intending to use it with my Ork vehicles.  I decided that I would paint the main KillKannon with Leadbelcher, now that Boltgun Metal is no longer available.

Having sent off for some of this Leadbelcher paint, I also included the Ork Flesh Contrast Paint in my order, as I was interested to see how these would work for my Orks. In a test I decided to paint the Krew of my Forge World Ork heavy weapons with the contrast paint.

I have to say I was quite impressed with the results on only a single coat.

Continue reading “KillKannon Grot Krew”