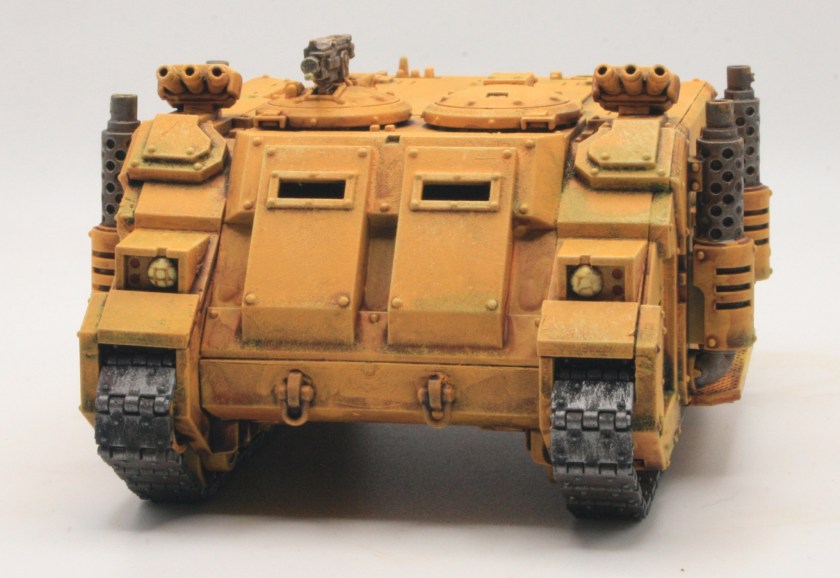
Next week you will be able to pre-order theVindicator Siege Tank plastic kit for The Horus Heresy.
Lay waste to enemy fortifications and pulverise whole squads of Astartes with salvos of shells spat from the hull-mounted demolisher cannon of the Vindicator Siege Tank.
I do like this model, but of course I already have its larger brother the Typhon heavy siege tank, so not sure I need another siege tank for my Imperial Fists.
This Black Templars Primaris Redemptor Dreadnought was on display at Warhammer World.
Redemptor Dreadnoughts are giant, powerful war machines that are used by the Adeptus Astartes, the Space Marines of the Imperium of Man. They are larger and more heavily armed than traditional Dreadnoughts, and they are equipped with a variety of advanced technologies that allow them to operate with surprising dexterity and speed, even though their pilots are entombed in cybernetic sarcophagi.
Redemptor Dreadnoughts are armed with a variety of powerful weapons, including a heavy flamer, an onslaught gatling cannon, and a macro plasma incinerator. These weapons can tear through enemy armour and flesh with ease, making Redemptor Dreadnoughts a fearsome sight on the battlefield.
In addition to their firepower, Redemptor Dreadnoughts are also protected by thick armour that can withstand heavy fire. This makes them ideal for spearheading assaults or holding the line against enemy attacks.
Redemptor Dreadnoughts are piloted by Astartes who have been mortally wounded in battle. These warriors are entombed in cybernetic sarcophagi that keep their bodies alive and allow them to continue fighting for the Emperor. The neural links that connect the pilot to the Dreadnought allow them to control the machine with surprising dexterity and speed, even though they are unable to move their own bodies.
Redemptor Dreadnoughts are a valuable asset to any Astartes force. They are powerful, versatile, and deadly, and they can turn the tide of any battle. Redemptor Dreadnoughts are a testament to the Adeptus Astartes’ dedication to never give up, no matter the cost. These mighty war machines are a symbol of hope for the Imperium, and they continue to fight for the Emperor even after their pilots have been mortally wounded.
Operation Sea Lion was the code name for Nazi Germany’s planned invasion of the United Kingdom during the Battle of Britain in World War II. The operation was never launched, as the German Luftwaffe failed to achieve air superiority over the Royal Air Force (RAF).
The plan for Operation Sea Lion was developed in the summer of 1940, after the German victory in the Battle of France. Hitler believed that Britain would be forced to surrender if it was invaded. The German army would land on the south coast of England and quickly overwhelm the British forces.
The invasion was scheduled to take place in September 1940. However, the Luftwaffe was unable to achieve air superiority over the RAF. The RAF Fighter Command fought a series of decisive battles against the Luftwaffe, and by the end of September, the Germans were forced to postpone Operation Sea Lion indefinitely.
The failure of Operation Sea Lion was a major turning point in the war. It showed that the British were not going to surrender without a fight, and it gave the Allies time to build up their forces for the eventual invasion of Europe.
Landing between Dover and Hythe, German troops push inland supported by the Luftwaffe and the impregnable panzers, and strike out towards London. The British, desperate to defeat the invaders, rally and prepare for a crucial confrontation at Maidstone. Realistic, carefully researched and superbly written, Invasion is a classic of alternate history and a thought-provoking look at how Britain’s war might have been.
There was one section which caught my eye
…the men of Infanterie Regiment Grossdeutschland, several hundred of whose members were trained to ride in the remarkable Fieseler Storch monoplane which could deliver five assault troopers at a time on landing strips only a few yards in length.
Fieseler Fi 156 Storch at RAF Cosford.
The Fieseler Fi 156 Storch was a small German liaison aircraft built by Fieseler before and during World War II. It remains famous for its excellent STOL performance and low stall speed of 31 mph.
This got me thinking about a possible gaming scenarios of the Infanterie Regiment Grossdeutschland flying in during Operation Sealion.
Airfield Attack
In an attempt to capture an airfield intact, the Infanterie Regiment Grossdeutschland fly into an RAF airfield in their Fieseler Storch aircraft. Their plan to take the airfield so that the Luftwaffe can fly in more troops and supplies.
During the Second World War in 1941, Crete was invaded by German airborne forces while it was being held by Greek, British, and Commonwealth forces. The Allied land forces failed to recognize the crucial significance of the airfields and therefore did not defend them sufficiently, which enabled the German invasion to succeed largely. As a result, the German paratroop and glider forces were able to capture the RAF base at Maleme with significant casualties. The Germans were subsequently reinforced by air from behind Allied lines, ultimately resulting in the loss of the entire island and substantial Allied casualties in what was later known as the Battle of Crete.
You can imagine a similar scenario here during Operation Sealion.
The airfield is poorly defended, RAF personnel and a few armed guards.
Once taken, the Germans need to hold the airfield against attempts by local British forces (regular army or even Home Guard) to retake the airfield, so that the Luftwaffe can fly in reinforcements and much needed supplies.
You could create a turn based narrative, for scoring points. The more turns the Germans hold the airfield for, the more points they get.
Taking Dover Castle
The outbreak of the Second World War in 1939 saw the tunnels converted first into an air-raid shelter and then later into a military command centre and underground hospital.
In an attempt to decapitate the British command, the Infanterie Regiment Grossdeutschland fly onto Dover Castle in their Fieseler Storch aircraft. Their plan to take the castle, capture the bunkers and disruptBritish command and control during the German invasion.
Dover Castle is well defended and if the Germans are successful in taking the castle, then they can expect a British counter-attack to try and retake it.The Castle is defended by regular British army forces.
Landing on the Mall
The Mall is a tree-lined road in London that runs from Buckingham Palace to Trafalgar Square. It is a popular tourist destination and is often used for ceremonial events, such as royal weddings and parades. The Mall was originally built in the 18th century as a fashionable promenade. It was later redesigned in the early 20th century to create a grand processional route in honor of Queen Victoria. The Mall is now lined with trees and has a number of important landmarks, including Admiralty Arch, the Victoria Memorial, and St. James’s Palace.
The Infanterie Regiment Grossdeutschland fly into London in their Fieseler Storch aircraft and land on the Mall.
Now they land in central London to capture key objectives, or even planning to capture high profile prisoners.
From here they can get to 10 Downing Street, Buckingham Palace, the Ministry of War, Horse Guards, BBC Broadcasting House and other key strategic targets.
Another idea is for the The Infanterie Regiment Grossdeutschland fly into London in their Fieseler Storch aircraft and land on the Mall. They then need to prepare the Mall as a makeshift runway for Junkers Ju52 transports bringing in reinforcements and supplies.
Junkers Ju52/3M (CASA 352L) at RAF Cosford.
The Ju 52 is a three-engined, all-metal monoplane that was first flown in 1932. It was used by the German Air Force during World War II and is still in use today by a number of civilian operators. The Ju 52 is known for its ruggedness and reliability, and it has been used in a variety of roles, including passenger transport, cargo transport, and military transport.
The Mall is 930 metres long and 36 metres wide. The Junkers Ju52 had a wingspan of 29 metres, but only needs a landing strip of 457 metres. It can also take off in just over 600 metres. It would be a tight fit, but the ability to land a transport in the heart of London would make it much easier to both reinforce an invasion force, but also to take away any prisoners.
There are potentially lots of other ideas for scenarios for the Infanterie Regiment Grossdeutschland and their Fieseler Storch aircraft during Operation Sealion, which I might explore in another blog post.
The Messerschmitt Me 410 Hornisse (Hornet) was a German heavy fighter and Schnellbomber (fast bomber) used by the Luftwaffe during World War II. It was developed from the Me 210, which had been plagued by problems with stability and handling. The Me 410 addressed these issues with a new wing design, a longer fuselage, and more powerful engines. It was also armed with a more powerful armament than the Me 210.
This Messerschmitt Me 410 Hornisse was on display at RAF Cosford.
The Me 410 entered service in 1943 and was used in a variety of roles, including fighter, bomber, reconnaissance, and night fighter. It was most effective in the fighter role, where it was used to escort bombers and attack enemy fighters. The Me 410 was also used to attack ground targets, including tanks and troop concentrations.
The Me 410 was a capable aircraft, but it was not without its flaws. It was relatively slow for a heavy fighter, and it was not as manoeuvrable as some of its contemporaries. However, it was well-armed and had a long range, making it a valuable asset to the Luftwaffe.
The Me 410 was produced in a number of variants, including the Me 410A, Me 410B, and Me 410C. The Me 410A was the basic variant, armed with two 20mm MG 151 cannons and four 7.92mm MG 17 machine guns. The Me 410B was a bomber variant, armed with a bomb load of up to 2,200 pounds. The Me 410C was a night fighter variant, armed with a radar and a 30mm MK 108 cannon.
The Me 410 was used in combat until the end of World War II. It was a successful aircraft, and it played a significant role in the Luftwaffe’s war effort.
My latest model for my Imperial Fists Horus Heresy force is the Typhon Heavy Siege Tank.
The Typhon Heavy Siege Tank was released as a plastic kit for The Horus Heresy. I’ve always liked the Forge World resin model and so was pleased to get one of the new plastic kits for my Imperial Fists force.
It was then onto shading the model. I used some Citadel Reikland Fleshshade Shade, aiming to achieve the same result I got with my first Deimos Pattern Rhino.
This time though, compared to some of my other models I went with an initial lighter shade, with the intention to add more later.
I gave the main weapon a wash of Agrax Earthshade Shade.
I also shaded the gun shield with Citadel Reikland Fleshshade Shade.
The Immolator-pattern armoured assault transport is a heavily armoured vehicle used by the Adeptus Ministorum, the Ecclesiarchy of the Imperium of Man. It is a variant on the Rhino chassis, and is used to transport troops into battle.
The Immolator is armed with a twinned pair of heavy weapons, which can be either a pair of heavy bolters, a pair of flamers, or a pair of meltaguns. It also has a stained-armaglass ballistic shield, which protects the vehicle from incoming fire.
The Immolator is a valuable asset to any Adeptus Ministorum force. It is able to transport troops quickly and safely into battle, and its heavy weapons can provide devastating firepower.
The Immolator is also a symbol of the Adeptus Ministorum’s power and authority, and its presence on the battlefield is often enough to demoralise the enemy.
The Immolator is a versatile and powerful vehicle that is used by the Adeptus Ministorum in a variety of roles. It is a valuable asset to any Adeptus Ministorum force, and its presence on the battlefield is often enough to demoralise the enemy.
The Vickers A1E1 Independent was a British multi-turreted tank prototype built between the First and Second World Wars. This is the Vickers A1E1 Independent at the Tank Museum.
The A1E1 was armed with a 47mm gun in a central turret and four machine guns in four smaller turrets.
It was heavily armored, weighing 33 tons. The tank was designed to be a breakthrough tank, capable of breaking through enemy lines and supporting infantry.
However, the A1E1 was also very slow and difficult to maneuver. It was also expensive to produce.
As a result, it was never mass-produced. However, it did influence the design of many other tanks, including the Soviet T-35 and the German Neubaufahrzeug.
Here are some of the key features of the Vickers A1E1 Independent:
Multi-turreted design
Heavy armor
Large size
Slow speed
Difficult to maneuver
Expensive to produce
Despite its limitations, the Vickers A1E1 Independent was an important tank in the development of tank design. It influenced the design of many other tanks, and it helped to pave the way for the development of more powerful and maneuverable tanks in the Second World War.
The positioning and lighting of the Vickers A1E1 Independent in the tank museum made it difficult to photograph easily, so here is an official photograph of the Vickers A1E1 Independent outdoors.
Photograph KID 109 from the collections of the Imperial War Museums (collection no. 6000-02)
The A1E1 was also the subject of industrial and political espionage. The plans for the tank were stolen by Soviet agents, who may have used them to design their own multi-turreted tanks. This event could inspire a number of skirmish games or role playing scenarios, such as:
A group of Soviet agents, aided by communist sympathizers, attempt to break into the Vickers factory to steal the plans for the A1E1. British police, the Security Services, and even troops attempt to stop them.
A group of British soldiers are tasked with defending the Vickers factory from a Soviet attack. They must use the A1E1 to fight off the Soviets and protect the plans.
A group of players take on the roles of the different factions involved in the theft of the A1E1 plans. They must use their skills and resources to achieve their goals.
These are just a few ideas for how the Vickers A1E1 Independent could be used in a skirmish game or role playing scenario. With its unique design and history, the A1E1 is a tank that is sure to inspire many different stories.
Though never developed beyond the prototype stage, you can imagine that it might have entered production if the Second World War had started earlier, or we had the potential scenario of A Very British Civil War.
The A1E1 Independent was a unique and innovative tank design. It had the potential to be a very effective tank in the right circumstances. If the Second World War had started earlier, or if there had been a British Civil War, the A1E1 might have entered production and played a significant role in the conflict.
Classic tanks from the Forge World range return to the Horus Heresy at the Games Workshop webstore, upgraded with new plastic sponson sprues that make it easier than ever to add weapon variety to your armoured companies.
The various resin models, such as the Mastodon Heavy Assault Transport, will now come with the sponsons sprue that is available now with the plastic releases that we have seen.
There is an implication here that future Horus Heresy releases may now be resin models. Especially as the only preview we have seen over recent months has been the Vindicator.
Though that may also mean that the Legion models we have seen, will now be supplemented with plastic releases for other Horus Heresy forces, such as the Solar Auxilia.
I had been thinking about getting this kit for a while. So on a shopping trip to my local games shop I decided to make an impulse purchase and buy the box. Well it was nearly 30% cheaper than on the GW site.
Having cleaned the plastic parts I gave them a Corax White undercoat. I then started painting the basecoat across the scrap piles and barricades using a combination of Base and Contrast Citadel paints. I continued to paint the different barricades, using, as before, Base and Contrast paints.
Having finished the base coat on pile of scrap 3, I gave it a wash using Citadel Agrax Earthshade Shade.
The Battle of the Pelennor Fields was a battle for the city of Minas Tirith, and ultimately for Gondor, immediately following a large-scale siege of Minas Tirith by Sauron’s army. It was the greatest battle of the War of the Ring, and indeed the largest of the entire Third Age. Major casualties resulted from the battle, including the deaths of King Théoden and the Witch-king of Angmar.
This Lord of the Rings Battle Game diorama was on display in the entrance hall at Warhammer World.