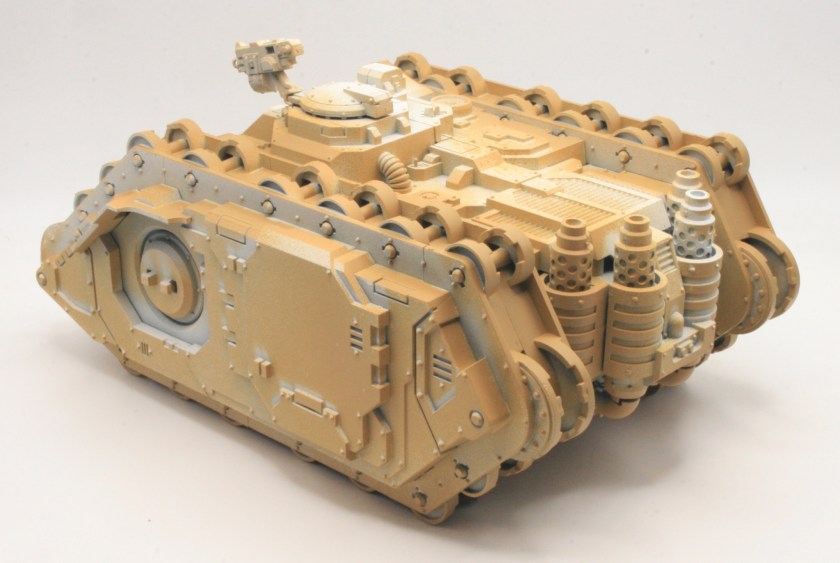
Constructing the Deimos Pattern Predator Battle Tank

The Predator is perhaps the best known and most widespread variant of the basic Rhino chassis. Augmented with superior armour and firepower, it entirely sacrifices the Rhino’s troop transport capacity in favour of ammunition and generators for its formidable weapon systems. 

One of my Christmas presents was the Deimos Pattern Predator Battle Tank.

I started putting the model together. It does go together quite easily, though I found some parts challenging, especially the hull roof.

In the end I got some G clamps out to hold the hull roof in place and glued it into place with superglue rather than plastic cement. I think part of the reason was that I had run out of Humbrol Liquid Poly, but my local model shop had run out and the replacement I got was new to me and I am still getting use to it.

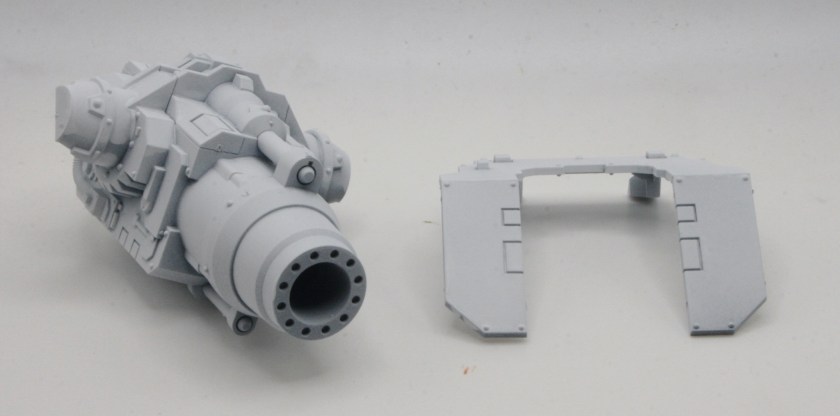
I went with the rapid-fire Predator cannon for the main turret weapon and lascannons for the sponsons.

For painting I kept the sponsons separate and I can easily remove the turret as well.

As with my demios-pattern Rhinos I left off the tracks and will paint them separately, before affixing them to the model. It can be challenging to get the track ends under the track guards, but with this deimos-pattern model it is easier than the previous Rhino model.

I did think about adding the prow or dozer blade to the model, but in the end I went with towing hooks as with my other model. The main reason was not so much the look, but more about the challenge in painting it, I am sure I would miss bits.

I am not too happy with the rear of the hull top and how it attaches to the hull.

See the workbench feature on the Deimos Pattern Predator Battle Tank.

Constructing another Plastic Deimos Pattern Rhino

The Rhino is the most widely used armoured personnel carrier in the Imperium. Based on ancient STC technology, the fundamental design is robust, reliable, and easy to maintain, with an adaptive power plant that can run off a wide variety of fuels, making it perfect for the wide-ranging armies of the Great Crusade – and the wars of the Horus Heresy. 

I was pleased to see one of the new Horus Heresy releases announced at Warhammer Fest was the Plastic Deimos Pattern Rhino. So when it was available for pre-order I clicked through and ordered the kit from my local FLGS. You can see the workbench for that Rhino here. I was lucky enough to get a second Rhino for a Christmas present.

The model has many more parts and is a more detailed kit than the original plastic Rhino kit that came out in the 1980s. It does go together quite easily, though I found some parts challenging, especially the hull roof.

In the end I got some G clamps out to hold the hull roof in place and glued it into place with superglue rather than plastic cement. I think part of the reason was that I had run out of Humbrol Liquid Poly, but my local model shop had run out and the replacement I got was new to me and I am still getting use to it.

As with my other Rhino I left off the tracks and will paint them separately, before affixing them to the model. It can be challenging to get the track ends under the track guards, but with this deimos-pattern model it is easier than the previous Rhino model.

I did think about adding a gunner cupola to the model, but in the end went with a simple version of the Rhino and armed with a single bolter.

Another view.

I did think about adding the prow to the model, but in the end I went with towing hooks as with my other model. The main reason was not so much the look, but more about the challenge in painting it, I am sure I would miss bits.

I do like this model. I am thinking about getting another one to convert it into a Looted Ork Rhino.

See the full workbench feature on the second Deimos-pattern Rhino.


Deimos Pattern Predator Battle Tank

The Predator is perhaps the best known and most widespread variant of the basic Rhino chassis. Augmented with superior armour and firepower, it entirely sacrifices the Rhino’s troop transport capacity in favour of ammunition and generators for its formidable weapon systems. The result is an effective and versatile tank of the line, with an excellent balance of speed, firepower, and protection. The Predator’s robust design can field a wide variety of armament configurations – the Legiones standard is a rapid-firing turret mounted autocannon, but other configurations include a powerful heavy lascannon, or more exotic grav and volkite weapons.

One of my Christmas presents was the Deimos Pattern Predator Battle Tank.

Unlike the original Rhino, I never bought the original Predator, nor even the more recent model.

Looking at the sprues there are a lot of parts.

It also shares two sprues with the Deimos-pattern Rhino.

The fist stage will be constructing the model.

Another Plastic Deimos Pattern Rhino

The Rhino is the most widely used armoured personnel carrier in the Imperium. Based on ancient STC technology, the fundamental design is robust, reliable, and easy to maintain, with an adaptive power plant that can run off a wide variety of fuels, making it perfect for the wide-ranging armies of the Great Crusade – and the wars of the Horus Heresy. As such, the Rhino chassis serves as a basis for many other war machines, and these transports are produced in their thousands – several distinct patterns are in common use throughout the galaxy, with the heavily-armed Deimos being the most widespread amongst the Space Marine Legions.

I was pleased to see one of the new Horus Heresy releases announced at Warhammer Fest was the Plastic Deimos Pattern Rhino. So when it was available for pre-order I clicked through and ordered the kit from my local FLGS. You can see the workbench for that Rhino here.

I was lucky enough to get a second Rhino for a Christmas present.

I am aiming to paint this Rhino in the same way as I painted my first one.

Looking at the sprues (on the GW site) there are a lot of parts, a lot more parts than when the original plastic Rhino kit came out in the 1980s.

The model has many more parts and is a more detailed kit than the original plastic Rhino kit that came out in the 1980s.

Detailing the Forge World Grey Knights Dreadnought

I have had a Mark IV Forge World Grey Knights Dreadnought on my workbench for a while. After getting some weapon arms for the model. I gave the main model a black undercoat and started base coating with a metallic paint. The weapons I had given a white undercoat. Getting it out from storage, I decided to almost start again and gave the model a base spray of Leadbelcher. I gave the model a wash of Nuln Oil Shade. For the next stage I used some Citadel Leadbelcher. I took a large brush and gave the model, what I would call, a heavy drybrush. I then did a lighter drybrush of various silver paints.

I did intend to paint the base for the model next, but upon checking the workbench feature for my Grey Knights, I realised that I needed a paint I didn’t have. For my Grey Knights I painted the flocked (well sanded) bases with Bestial Brown and then drybrushed with Bleached Bone. After that I went over the edge of the slottabase again with Bestial Brown.

I don’t have a pot of Bestial Brown, and Citadel no longer manufacture that colour. According to the Dakka Dakka paint compatibility chart the best option is Mournfang Brown. Might have to pop out and buy a pot of that.

I did though paint the paper for the purity seals on the Dreadnought using Layer Ushabti Bone. I also used Bronze and Gold Sharpie pens for some of the metallic aspects of the model.

Drybrushing the Dreadnought

This Space Marine Dreadnought was one of the models included the Assault on Black Reach boxed set. The Warhammer 40,000 Assault on Black Reach was 5th edition’s “boxed game” or “starter set”. Having constructed the model I then put it away for a while… I got the model out of storage and decided I would paint this up as an Imperial Fists Dreadnought to accompany my new Deimos-pattern Rhino. I gave it a white undercoatusing White Scar spray. The next stage was the base coat and I did consider to either use a yellow spray, or to use the new Imperial Fist contrast paint. In the end I went with the new Imperial Fist contrast paint and I was quite pleased with the end result. I knew that though this looked quite good, it wasn’t quite the effect I wanted, so I shaded most of the model with Reikland Fleshshade Shade. I painted the weaponry and the exhausts on the Dreadnought with Leadbelcher.

For the next stage I used some Citadel Layer Yriel Yellow. I took a large brush and gave the model, what I would call, a heavy drybrush. I put paint on the brush, and then used some kitchen towel to remove most of the paint, and then using a stippling process added paint to the model.

I think I still need to do something about the right leg shield.

See the workbench feature on the Space Marine Dreadnought.

More drybrushing on the Forge World Grey Knights Dreadnought

I have had a Mark IV Forge World Grey Knights Dreadnought on my workbench for a while. After getting some weapon arms for the model. I gave the main model a black undercoat and started base coating with a metallic paint. The weapons I had given a white undercoat. Getting it out from storage, I decided to almost start again and gave the model a base spray of Leadbelcher. I gave the model a wash of Nuln Oil Shade. For the next stage I used some Citadel Leadbelcher. I took a large brush and gave the model, what I would call, a heavy drybrush.

I followed this up with some lighter drybrushing, first with Base Grey Knights Steel, then Layer Ironbreaker and finally Layer Stormhost Silver.

The aim was to add brightness to the Dreadnought.

See the full workbench feature on the Forge World Grey Knights Dreadnought.

What else do I need to do…

Digging the model out from storage, I decided not that I would start again, but I certainly would have a different approach. I have had my Kill Bursta hanging around on the workbench for a while now, so it was s nice to make some significant progress on the model.

I was looking at the work I had done with the Ork Kill Bursta Tank. I liked the effect I had achieved on the engine.

There is still a fair bit of work to do on the model, but I am pleased with my progress so far.

I want to do some more weathering, but also to make it a little more Orky.

Tracking the Land Raider

I have on my workbench a standard Land Raider.

The standard Land Raider, also known as the Land Raider Phobos, is an Imperial main battle tank and troop transport which serves as the “armoured fist of the Space Marines.” The Land Raider’s heritage predates even the founding of the Imperium of Man, yet it remains the single most destructive weapon in the Adeptus Astartes’ arsenal.

For the basecoat I used Tausept Ochre. I lost interest in the model, so, it got put into storage. However having liked the paint scheme I was using on my Deimos-pattern Rhino, I decided that I would find the model and paint this Land Raider in the same scheme. The first thing I did was spray the underneath of the model with Citadel Zandri Dust. I gave the model a couple of light sprays of Army Painter Daemonic Yellow. I painted the weapon sub-assemblies. added detailing and painted the iconography. Then using various Citadel shades I washed and shaded the model. For the next stage I used some Citadel Layer Yriel Yellow. I took a large brush and gave the model, what I would call, a heavy drybrush.  The tracks for the Land Raider were painted, and the iconography was completed with washes and highlights.

The finished tracks were then glued to the Land Raider with superglue.

Really now looking the part.

See the workbench feature on the Land Raider.