Toning down the purity seals

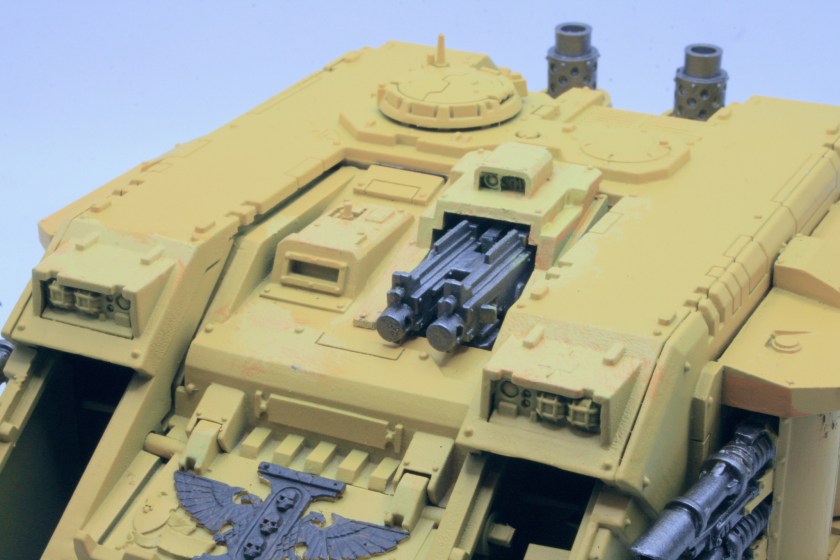
One model I got many years ago, well in 2006, was a Forgeworld Razorback the one with the much bigger turret, which I much prefer over the plastic kit version that you could get in the shops back then. I recently retrieved it from storage and decided that I would try and finish painting it. I was using Tausept Ochre as the base coat, however having liked the paint scheme I was using on my Deimos-pattern Rhino, I decided that I would paint the Razorback in the same scheme. Having sprayed the underneath of the model with Citadel Zandri Dust. I gave the model a basecoat of Army Painter Daemonic Yellow. This was followed with Leadbelcher for painting the exhausts and weaponry. The next step was painting the iconography and purity seals. I then slightly messed up the shading on the model, but think I managed to get the effect I was looking for. For the next stage I used some Citadel Layer Yriel Yellow. I took a large brush and gave the model, what I would call, a heavy drybrush. The next step was to paint and highlight the iconography. I then glued the tracks to the Razorback using superglue.

I also took the time to brighten up the purity seals and other iconography after it was dulled down by the shades and washes. I also highlighted the purity seals with some White Scar paint.

However, as with my Repressor, I think I overdid this, they are too bright for the model. I decided to dull these down a bit with some Citadel Seraphim Sepia Shade.

I think that this works better than bright white purity seals.

See the workbench feature on the Razorback.

Those purity seals are too white!

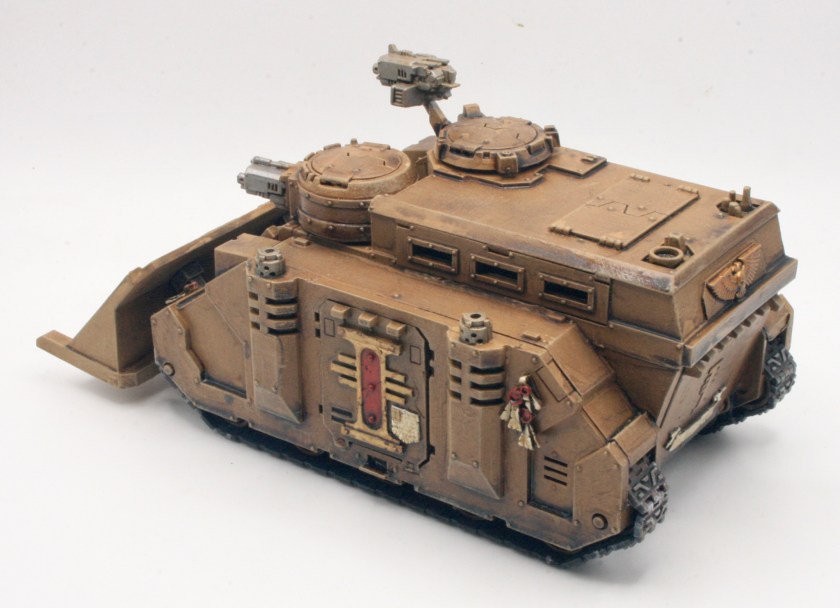
The Repressor tank is often used by Sisters of Battle as transport, and by the Adeptus Arbites in an anti insurgency role. I started building and painting this model back in 2007, I recently retrieved it from storage and decided that I would try and finish painting it. I realised I had made quite significant progress and it wouldn’t take too long to finish it off.

Having sprayed the model with Citadel Zandri Dust over the existing Tausept Ochre base coat and black undercoat, I started the detailing, using Leadbelcher on the weapons and the exhausts. The next step was painting the iconography and purity seals. I then gave the model a wash using Citadel shades. I then did some additional shading using different shades. The next stage was some drybrushing, for this I used Citadel Zandri Dust. I fixed the tracks to the model.

I also took the time to brighten up the purity seals and other iconography after it was dulled down by the shades and washes. I also highlighted the purity seals with some White Scar paint.

However, I think I overdid this, they are too bright for the model. I decided to dull these down a bit with some Citadel Seraphim Sepia Shade.

I was pleased with this, giving the purity seals an older worn look to them.

See the workbench feature on the Inquisitorial Stormtroopers Repressor Transport.
.

Detailing the Forge World Grey Knights Dreadnought

I have had a Mark IV Forge World Grey Knights Dreadnought on my workbench for a while. After getting some weapon arms for the model. I gave the main model a black undercoat and started base coating with a metallic paint. The weapons I had given a white undercoat. Getting it out from storage, I decided to almost start again and gave the model a base spray of Leadbelcher. I gave the model a wash of Nuln Oil Shade. For the next stage I used some Citadel Leadbelcher. I took a large brush and gave the model, what I would call, a heavy drybrush. I then did a lighter drybrush of various silver paints.

I did intend to paint the base for the model next, but upon checking the workbench feature for my Grey Knights, I realised that I needed a paint I didn’t have. For my Grey Knights I painted the flocked (well sanded) bases with Bestial Brown and then drybrushed with Bleached Bone. After that I went over the edge of the slottabase again with Bestial Brown.

I don’t have a pot of Bestial Brown, and Citadel no longer manufacture that colour. According to the Dakka Dakka paint compatibility chart the best option is Mournfang Brown. Might have to pop out and buy a pot of that.

I did though paint the paper for the purity seals on the Dreadnought using Layer Ushabti Bone. I also used Bronze and Gold Sharpie pens for some of the metallic aspects of the model.

More drybrushing on the Forge World Grey Knights Dreadnought

I have had a Mark IV Forge World Grey Knights Dreadnought on my workbench for a while. After getting some weapon arms for the model. I gave the main model a black undercoat and started base coating with a metallic paint. The weapons I had given a white undercoat. Getting it out from storage, I decided to almost start again and gave the model a base spray of Leadbelcher. I gave the model a wash of Nuln Oil Shade. For the next stage I used some Citadel Leadbelcher. I took a large brush and gave the model, what I would call, a heavy drybrush.

I followed this up with some lighter drybrushing, first with Base Grey Knights Steel, then Layer Ironbreaker and finally Layer Stormhost Silver.

The aim was to add brightness to the Dreadnought.

See the full workbench feature on the Forge World Grey Knights Dreadnought.

Tracking the Land Raider

I have on my workbench a standard Land Raider.

The standard Land Raider, also known as the Land Raider Phobos, is an Imperial main battle tank and troop transport which serves as the “armoured fist of the Space Marines.” The Land Raider’s heritage predates even the founding of the Imperium of Man, yet it remains the single most destructive weapon in the Adeptus Astartes’ arsenal.

For the basecoat I used Tausept Ochre. I lost interest in the model, so, it got put into storage. However having liked the paint scheme I was using on my Deimos-pattern Rhino, I decided that I would find the model and paint this Land Raider in the same scheme. The first thing I did was spray the underneath of the model with Citadel Zandri Dust. I gave the model a couple of light sprays of Army Painter Daemonic Yellow. I painted the weapon sub-assemblies. added detailing and painted the iconography. Then using various Citadel shades I washed and shaded the model. For the next stage I used some Citadel Layer Yriel Yellow. I took a large brush and gave the model, what I would call, a heavy drybrush.  The tracks for the Land Raider were painted, and the iconography was completed with washes and highlights.

The finished tracks were then glued to the Land Raider with superglue.

Really now looking the part.

See the workbench feature on the Land Raider.

Detailing the MkIIb Land Raider

The Land Raider is an Imperial main battle tank and troop transport which serves as the “armoured fist of the Space Marines.” The Mark IIb Land Raider Phobos is one of the earliest marks of the standard pattern of Land Raider, and it still bears similarities to both the Land Raider Proteus and the Spartan Assault Tank that served as the models for the design. The Mark IIb Land Raider Phobos is the only pattern of the standard Land Raider Phobos that uses the older armoured sponsons, as they do not allow the weapons they hold to fully rotate.

When I got a Forge World MkIIB Land Raider and was originally painting it up, the plan was to this as a Grey Knights Land Raider in desert camouflage. I wrote up some more reflections recently on my MkIIB Land Raider, on the current state of the painting and what I needed to do next.

After giving the model a spray of White Scar over the original base coat of Tausept Ochre I gave the model a new basecoat of Daemonic Yellow spray from Army Painter.

The next stage was painting the details on the model. This included the bolters and lascannons.

I also painted the rear exhausts and starting on the iconography.

I do like the exhausts on this model which differ from those included with the plastic kit as seen on my other Land Raider. They are single chunkier exhausts.

The next stage will be finishing painting the exhausts, weapons and iconography. The iconography actually matches that on my Repressor.

See the full Mark IIb Land Raider workbench.

Tracking the Razorback

One model I got many years ago, well in 2006, was a Forgeworld Razorback the one with the much bigger turret, which I much prefer over the plastic kit version that you could get in the shops back then. I recently retrieved it from storage and decided that I would try and finish painting it. I was using Tausept Ochre as the base coat, however having liked the paint scheme I was using on my Deimos-pattern Rhino, I decided that I would paint the Razorback in the same scheme. Having sprayed the underneath of the model with Citadel Zandri Dust. I gave the model a basecoat of Army Painter Daemonic Yellow. This was followed with Leadbelcher for painting the exhausts and weaponry. The next step was painting the iconography and purity seals. I then slightly messed up the shading on the model, but think I managed to get the effect I was looking for. For the next stage I used some Citadel Layer Yriel Yellow. I took a large brush and gave the model, what I would call, a heavy drybrush. The next step was to paint and highlight the iconography.

I then glued the tracks to the Razorback using superglue.

I also drybrushed the front panel iconography with various shades of grey. I also took the time to brighten up the purity seals and other iconography after it was dulled down by the shades and washes. I also highlighted the purity seals with some White Scar paint.

There is still some work to do with this model, but I am pleased I have made progress and nearly finished it.

See the workbench feature on the Razorback.

Tracking the Inquisitorial Stormtroopers Repressor Transport

The Repressor tank is often used by Sisters of Battle as transport, and by the Adeptus Arbites in an anti insurgency role. I started building and painting this model back in 2007, I recently retrieved it from storage and decided that I would try and finish painting it. I realised I had made quite significant progress and it wouldn’t take too long to finish it off.

Having sprayed the model with Citadel Zandri Dust over the existing Tausept Ochre base coat and black undercoat, I started the detailing, using Leadbelcher on the weapons and the exhausts. The next step was painting the iconography and purity seals. I then gave the model a wash using Citadel shades. I then did some additional shading using different shades. The next stage was some drybrushing, for this I used Citadel Zandri Dust. I also took the time to brighten up the purity seals and other iconography after it was dulled down by the shades and washes.

Despite having already affixed tracks to other Rhino variants on my workbench, I found this one quite challenging. No idea why, but it was more difficult to fix the tracks on the Repressor.

I also managed to break off the cupola double bolter, so I had to glue that back on. I also added the dozer blade.

I also highlighted the purity seals with some White Scar paint, but I think I overdid this, so might dull these down a bit with some shade.

There is still some work to do with this model, but I am pleased I have made progress and nearly finished it.

See the workbench feature on the Inquisitorial Stormtroopers Repressor Transport.

Painting the MkIIb Land Raider

The Land Raider is an Imperial main battle tank and troop transport which serves as the “armoured fist of the Space Marines.” The Mark IIb Land Raider Phobos is one of the earliest marks of the standard pattern of Land Raider, and it still bears similarities to both the Land Raider Proteus and the Spartan Assault Tank that served as the models for the design.

I got a Forge World MkIIB Land Raider and was originally painting it up as a Grey Knights Land Raider in desert camouflage. Eventually it would have looked like the Repressor.

I wrote up some more reflections recently on my MkIIB Land Raider, on the current state of the painting and what I needed to do next.

After giving the model a spray of White Scar over the original base coat of Tausept Ochre I gave the model a new basecoat of Daemonic Yellow spray from Army Painter.

The next stage will be painting the exhausts, weapons and iconography. Having painted the Deimos-pattern Rhino, my other Land Raider, and the Repressor I feel confident in painting the details on this model.

See the full Mark IIb Land Raider workbench.

Painting the Grey Knights Dreadnought

I have had a Mark IV Forge World Grey Knights Dreadnought on my workbench for a while. After getting some weapon arms for the model. I gave the main model a black undercoat and started base coating with a metallic paint. The weapons I had given a white undercoat. Getting it out from storage, I decided to almost start again and gave the model a base spray of Leadbelcher. I gave the model a wash of Nuln Oil Shade.

For the next stage I used some Citadel Leadbelcher. I took a large brush and gave the model, what I would call, a heavy drybrush. I put paint on the brush, and then used some kitchen towel to remove most of the paint, and then using a stippling process added paint to the model.

This removed some of the pooling of the shade paint.

As you can see from this before photo.

See the full workbench feature on my Grey Knights Dreadnought.