In Warhammer World was a lovely Grey Knights army with a range of armoured vehicles. I have been working on a Grey Knights army for some time now. It includes some armoured vehicles including a Land Raider.
In the displays was this Grey Knights Land Raider.
The Land Raider Phobos is the standard main battle tank for the Space Marines, so it is no surprise that the Grey Knights make use of the armoured fist of the Space Marines.
This one had the iconography of the Grey Knights, these were resin doors from Forge World, which sadly are no longer available.
This is a Grey Knights Land Raider Crusader.Designed for anti-infantry assault fighting. In place of Lascannons, the Crusader is armed with Hurricane Bolters. Alongside is a front mounted hull Assault Cannon.
As it doesn’t have lascannons, it has extra troop carrying capacity as there is no requirement for las-power generators for the said lascannons.
A variant of the Land Raider is the Land Raider Redeemer, which in itself is a variant of the Land Raider Crusader. These versions of the Land Raider provide short-range assault support during anti-infantry attacks or for urban street fighting.
The Land Raider Redeemer replaces the Land Raider Crusader’s weapons with the dreaded sponson-mounted Flamestorm Cannons. These massive flame-based weapons send burning sheets of promethium into the enemy, and can be really effective against hardened bunkers. A highly effective vehicle for fighting dug-in infantry in urban areas.
I have been painting up two Grey Knights Land Raiders, one a standard Phobos variant, the other a Mark IIb with sponsons. Though I am now in the process of painting them as Imperial Fists models, but they still have the Grey Knights iconography.
Not quite a dreadnought, but similar this Grey Knights Nemesis Dreadknight was on display at Warhammer World.
Essentially this allows a Grey Knight to be stronger and carry heavier weapons.
It was developed and designed to take on the might of Greater Daemons and Daemon Princes.
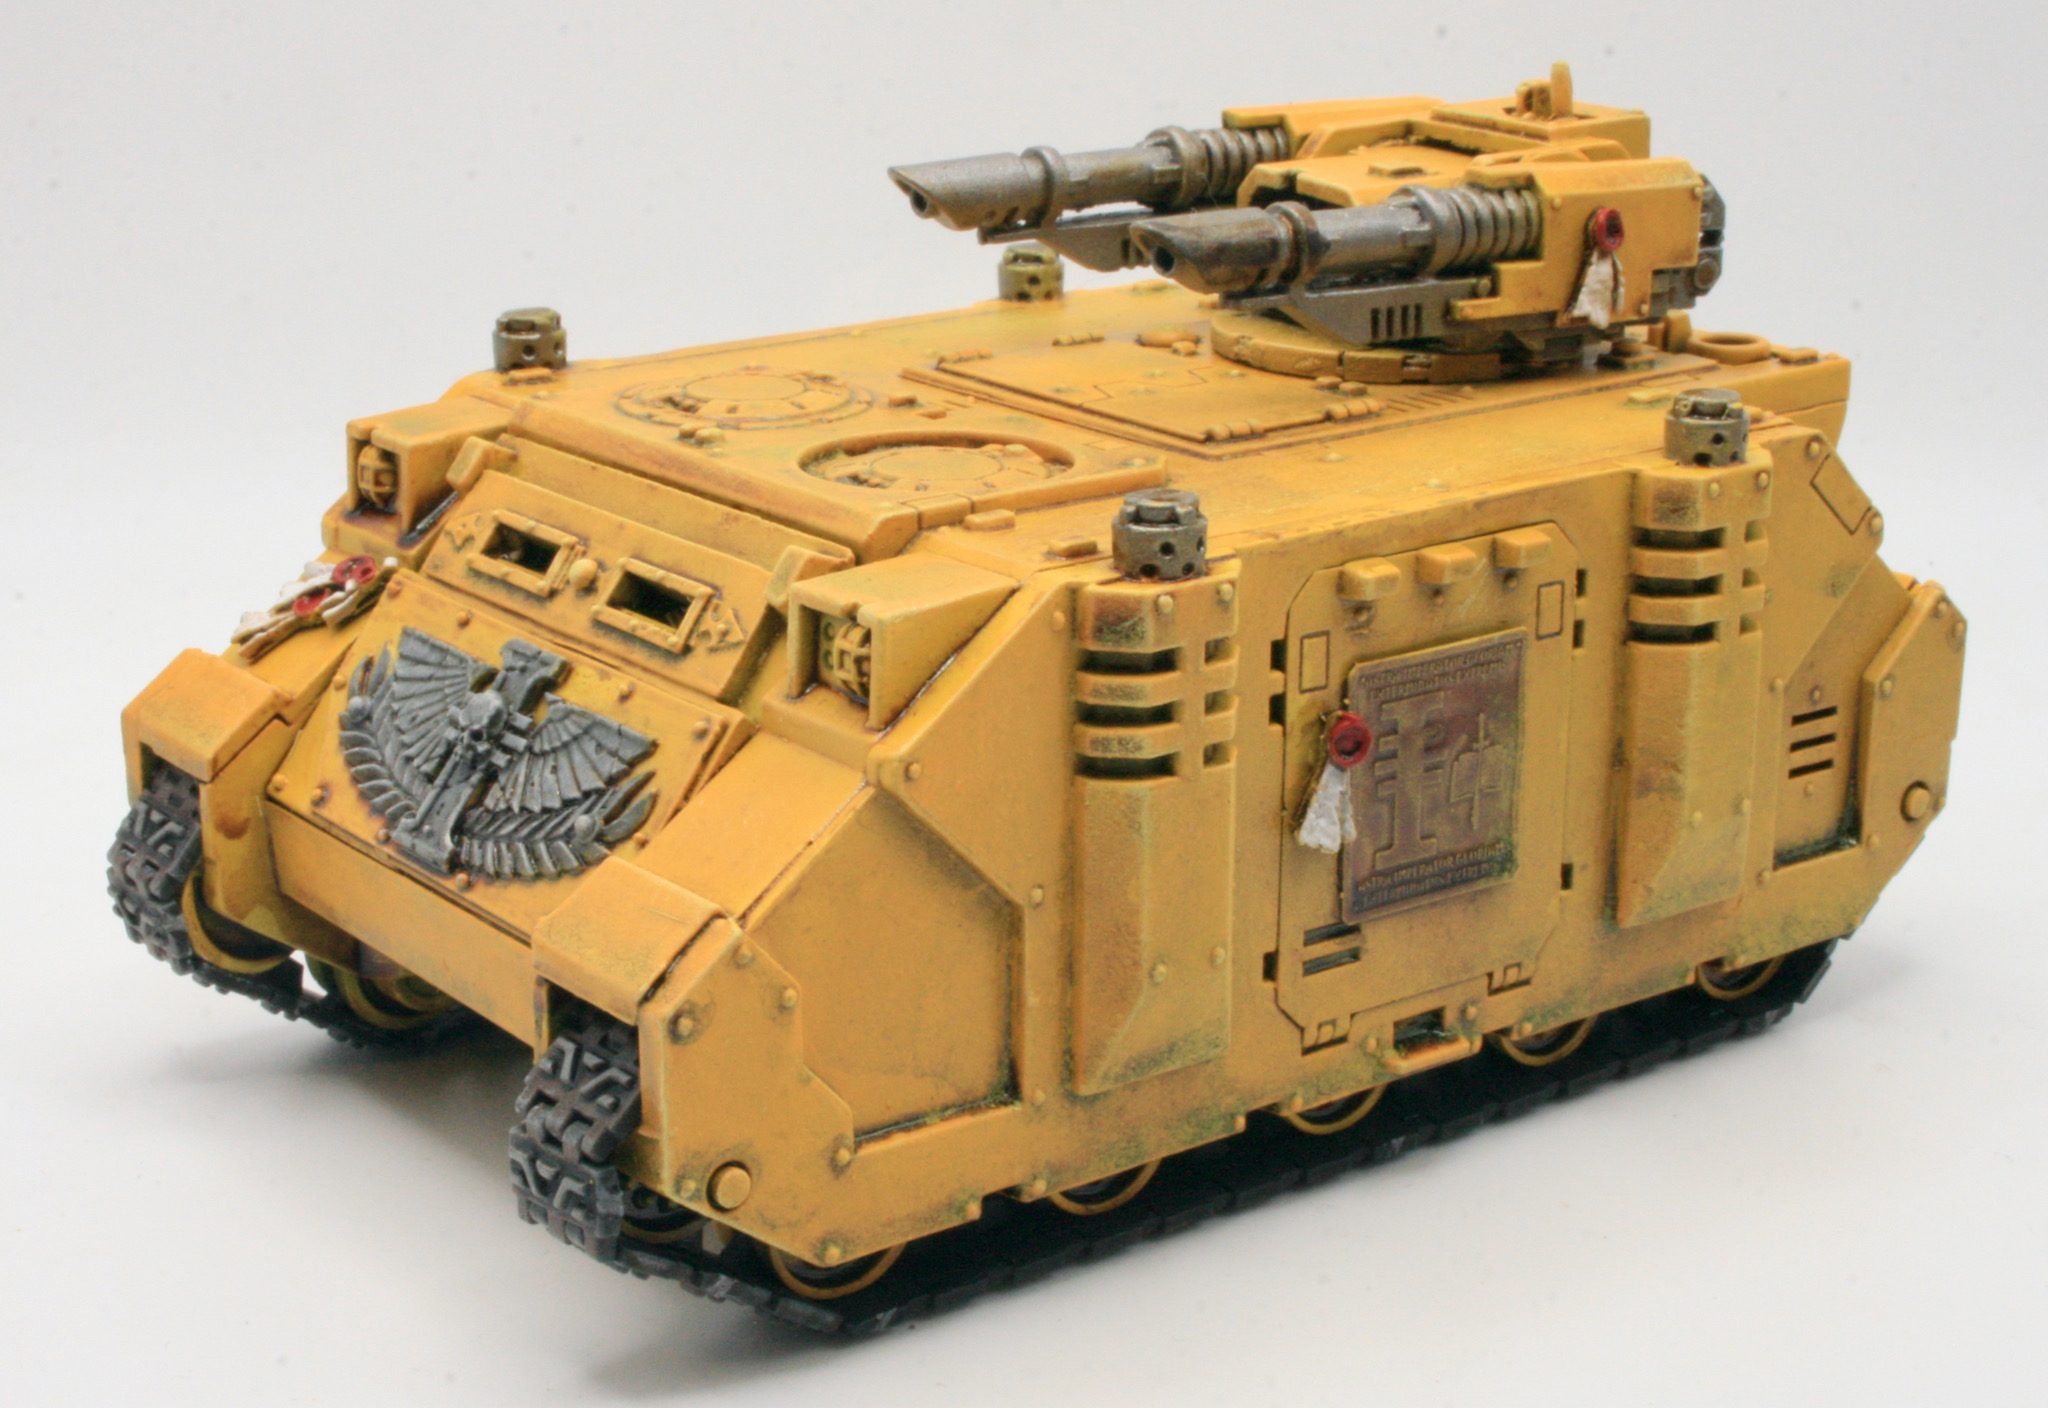
There was this Grey Knights Razorback.
Grey Knights Razorback
The Razorback is a tracked, armoured vehicle used by Space Marine Chapters. Its design is based on the Rhino chassis and as such is quite easy to manufacture, sharing many of its design features.
It is sometimes favoured over the Rhino because of its superior firepower, although this comes at the cost of less transport space.
There was also a Grey Knights Stormraven Gunship is an armoured versatile craft that combines the role of dropship, armoured transport and strike craft.
One model I got many years ago, well in 2006, was a Forgeworld Razorback the one with the much bigger turret, which I much prefer over the plastic kit version that you could get in the shops back then. I recently retrieved it from storage and decided that I would try and finish painting it.
I took some photographs of the Razorback on my desert scenery tile.
There is still some work to do with this model, but I am pleased I have made progress and nearly finished it.
I like how the Inquisitorial iconography has turned out on the model.
It’s a pity that, that range has been retired. I found some more resin purity seals and a spare Rhino frontal armour plate in one of my bits box.
One model I got many years ago, well in 2006, was a Forgeworld Razorback the one with the much bigger turret, which I much prefer over the plastic kit version that you could get in the shops back then. I recently retrieved it from storage and decided that I would try and finish painting it. I was using Tausept Ochre as the base coat, however having liked the paint scheme I was using on my Deimos-pattern Rhino, I decided that I would paint the Razorback in the same scheme. Having sprayed the underneath of the model with Citadel Zandri Dust. I gave the model a basecoat of Army Painter Daemonic Yellow. This was followed with Leadbelcher for painting the exhausts and weaponry. The next step was painting the iconography and purity seals. I then slightly messed up the shading on the model, but think I managed to get the effect I was looking for. For the next stage I used some Citadel Layer Yriel Yellow. I took a large brush and gave the model, what I would call, a heavy drybrush. The next step was to paint and highlight the iconography. I then glued the tracks to the Razorback using superglue.
I also took the time to brighten up the purity seals and other iconography after it was dulled down by the shades and washes. I also highlighted the purity seals with some White Scar paint.
However, as with my Repressor, I think I overdid this, they are too bright for the model. I decided to dull these down a bit with some Citadel Seraphim Sepia Shade.
I think that this works better than bright white purity seals.
One model I got many years ago, well in 2006, was a Forgeworld Razorback the one with the much bigger turret, which I much prefer over the plastic kit version that you could get in the shops back then. I recently retrieved it from storage and decided that I would try and finish painting it. I was using Tausept Ochre as the base coat, however having liked the paint scheme I was using on my Deimos-pattern Rhino, I decided that I would paint the Razorback in the same scheme. Having sprayed the underneath of the model with Citadel Zandri Dust. I gave the model a basecoat of Army Painter Daemonic Yellow. This was followed with Leadbelcher for painting the exhausts and weaponry. The next step was painting the iconography and purity seals. I then slightly messed up the shading on the model, but think I managed to get the effect I was looking for. For the next stage I used some Citadel Layer Yriel Yellow. I took a large brush and gave the model, what I would call, a heavy drybrush. The next step was to paint and highlight the iconography.
I then glued the tracks to the Razorback using superglue.
I also drybrushed the front panel iconography with various shades of grey. I also took the time to brighten up the purity seals and other iconography after it was dulled down by the shades and washes. I also highlighted the purity seals with some White Scar paint.
There is still some work to do with this model, but I am pleased I have made progress and nearly finished it.
One model I got many years ago, well in 2006, was a Forgeworld Razorback the one with the much bigger turret, which I much prefer over the plastic kit version that you could get in the shops back then. I recently retrieved it from storage and decided that I would try and finish painting it. I was using Tausept Ochre as the base coat, however having liked the paint scheme I was using on my Deimos-pattern Rhino, I decided that I would paint the Razorback in the same scheme.
Having sprayed the underneath of the model with Citadel Zandri Dust. I gave the model a basecoat of Army Painter Daemonic Yellow. This was followed with Leadbelcher for painting the exhausts and weaponry. The next step was painting the iconography and purity seals. I then slightly messed up the shading on the model, but think I managed to get the effect I was looking for.
For the next stage I used some Citadel Layer Yriel Yellow. I took a large brush and gave the model, what I would call, a heavy drybrush. I put paint on the brush, and then used some kitchen towel to remove most of the paint, and then using a stippling process added paint to the model.
The plan was that this would take the flat surfaces of the model back to the base colour.
I then gave the model a light drybrush of Citadel Layer Dorn Yellow.
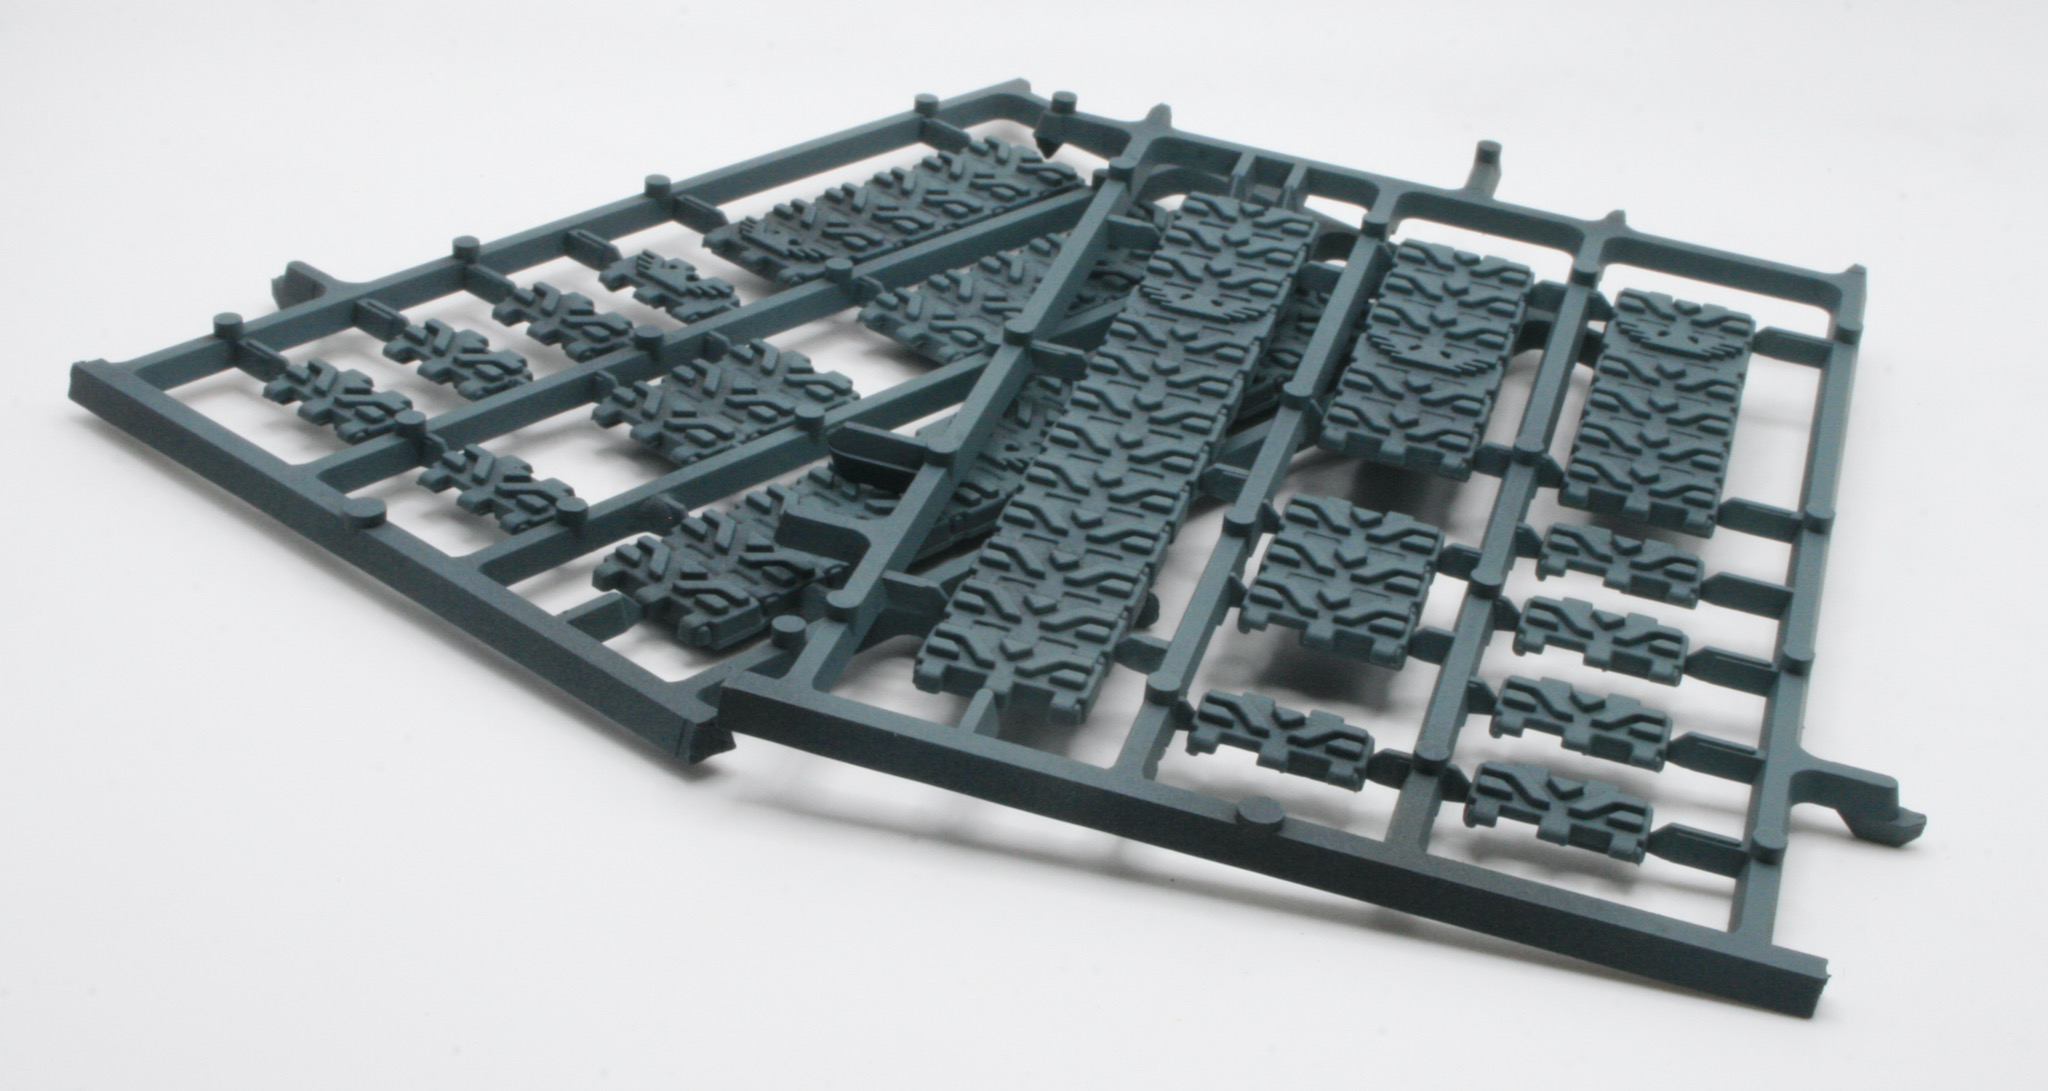
The tracks for the Razorback were given a spray of Mechanicus Standard Grey.
I then did a heavy drybrush of Gorthor Brown. The tracks, once dry, I then gave them a wash of Agrax Earthshade Shade. I then did a heavy drybrush of Gorthor Brown. The tracks, once dry, I then gave them a wash of Agrax Earthshade Shade. After painting and shading them, I drybrushed them lightly, first with Leadbelcher. I then did a very light drybrush with Terminatus Stone.
The next step was to paint and highlight the iconography.
This is to brighten up the purity seals and other iconography after it was dulled down by the shades and washes.
One model I got many years ago, well in 2006, was a Forgeworld Razorback the one with the much bigger turret, which I much prefer over the plastic kit version that you could get in the shops back then. I recently retrieved it from storage and decided that I would try and finish painting it. I was using Tausept Ochre as the base coat, however having liked the paint scheme I was using on my Deimos-pattern Rhino, I decided that I would paint the Razorback in the same scheme.
So, there I was ready to shade my Razorback in the same way as my Deimos-pattern Rhino. I did bring up my painting guide on the website. Even so I completely misread what I had done! Instead of using Citadel Reikland Fleshshade Shade I used Seraphim Sepia Shade.
Thought I had used Seraphim Sepia Shade on the Rhino, the primary and first shade was in fact Reikland Fleshshade.
It seemed to be okay.
However it wasn’t quite the same look as the Rhino. So I got out the Reikland Fleshshade.
This again wasn’t quite right, so I did some more shading.
I think the next stages of drybrushing will help soften the effect of the shading.
One model I got many years ago, well in 2006, was a Forgeworld Razorback the one with the much bigger turret, which I much prefer over the plastic kit version that you could get in the shops back then. I started this model back then, then out it in storage. I recently retrieved it from said storage and decided that I would try and finish painting it. I was using Tausept Ochre as the base coat, however having liked the paint scheme I was using on my Deimos-pattern Rhino, I decided that I would paint the Razorback in the same scheme.
Having sprayed the underneath of the model with Citadel Zandri Dust. I gave the model a basecoat of Army Painter Daemonic Yellow. This was followed with Leadbelcher for painting the exhausts and weaponry.
The next step was painting the iconography and purity seals. Purity seals were Ushabti Bone for the paper and Mephiston Red for the red wax.
For the brass etchings, I did consider painting these up, but in the end I painted them with a base coat of Warplock Bronze.
I had intended to use Sycorax Bronze, however my post of this was a little dried up… so I had to throw it away.
I did try out a wash on the main weaponry to see the effect it would have on the bronze painted iconography.
I also painted the door panels with Warplock Bronze.
This is the front of the Razorback.
I painted the front icon with Mechanicus Standard Grey aiming for a stone effect, after shading and drybrushing.
So, there I was ready to shade my Razorback in the same way as my Deimos Pattern Rhino. I did bring up my painting guide on the website. Even so I completely misread what I had done! Instead of using Citadel Reikland Fleshshade Shade I used Seraphim Sepia Shade.
I had used Seraphim Sepia Shade on the Rhino, it was that the primary and first shade was Reikland Fleshshade.
Ah well let’s see how it looks after it has dried.
Having started repainting my Land Raider, a MkIIb Land Raider, the Razorback and the Repressor, I decided to paint the tracks. Having liked what I did with the Deimos-pattern Rhino tracks, I went with the same process.
I had done a few different things with the different tracks, but most had a black undercoat.
I gave the Land Raider tracks a spray of Mechanicus Standard Grey.
I did the same for the Rhino tracks.
The tracks for the Deimos-pattern Rhino are much better than the tracks you get with the Rhino kit.
The next step will be a heavy drybrush of Gorthor Brown, then a wash of Agrax Earthshade Shade. The tracks will be finished off with a light drybrush, first with Leadbelcher, then Terminatus Stone.