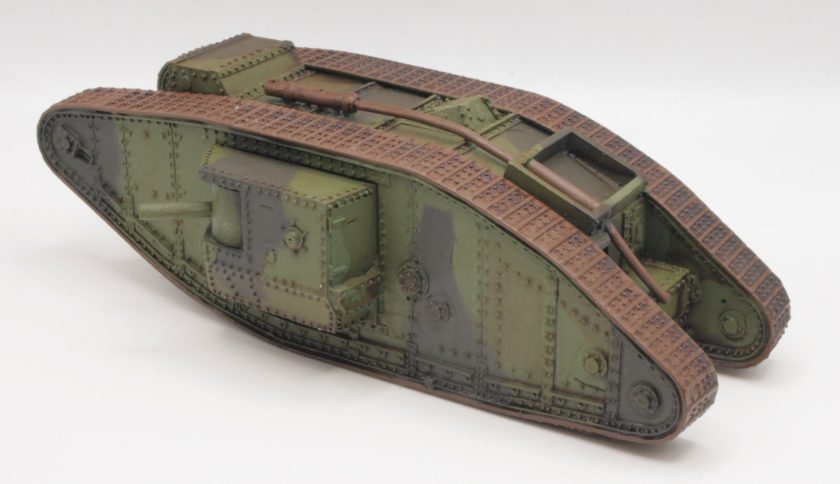
Home Guard Mark IV Male Tank

I am in the process of building a Bolt Action 28mm Home Guard force, I did want to add some armour to them with a Mark IV Male World War One tank put into service, even if it was merely as a mobile pillbox.

Having constructed and undercoated the Mark IV Tank the next stage was a base coat of Army Green Spray from the Army Painter range. I then used a Humbrol Tank Grey 67 spray for the dark colour camouflage pattern. For the tracks I used Citadel Gorthor Brown. I then gave the model a wash.

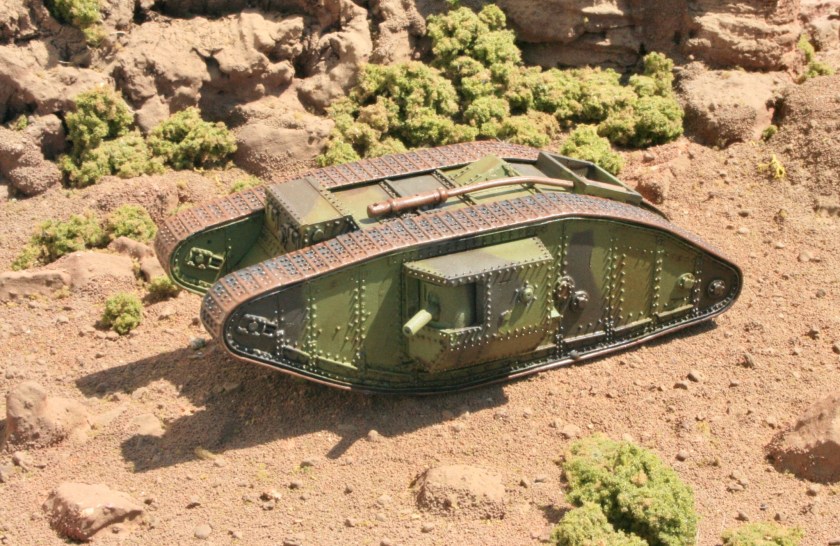
Here is the Mark IV in my desert terrain.

Home Guard Mark IV Male Tank

It isn’t quite finished I want to do some more weathering, as well as apply some markings. However, I am quite pleased with how it looks now.

Home Guard Mark IV Male Tank

See the workbench feature on the Home Guard Mark IV Male Tank.

Home Guard Thornycroft Type 2 Bison

This Home Guard Thornycroft Type 2 Bison was on display at Bovington.

The Bison was an extemporised armoured fighting vehicle frequently characterised as a mobile pillbox. Bisons were produced in Britain during the invasion crisis of 1940-1941. Based on a number of different lorry chassis, it featured a fighting compartment protected by a layer of concrete.

The Bison was not very mobile, and was only intended for use in static defence. However, it was relatively cheap and easy to produce, and could provide valuable protection for troops against enemy fire.

Bisons were used by the Royal Air Force (RAF) to protect aerodromes and by the Home Guard. They acquired the generic name “Bison” from their main manufacturer, Thornycroft.

It’s a good illustration of the desperate state of the defence of the United Kingsom in 1940. Take a lorry and add some concrete to turn it into an armoured vehicle. They were really no more than mobile pillboxes.

With a variety of chassis to work on, Bisons inevitably varied in detail, but were made in three distinct types:

Type 1 was the lightest. It had a fully armoured cab and a small armoured fighting compartment roofed with canvas.

Type 2 had an armoured cab roofed with canvas and a separate fully enclosed fighting compartment resembling a small pillbox on the back – communication between driver and crew must have been difficult.

Type 3 was the largest and heaviest. It had a contiguous cabin and fighting compartment completely enclosed in concrete armour.

Another photograph of the Home Guard Thornycroft Bison.

There are quite a few gaming ideas and scenarios that could use the Bison.

Operation Sealion

The year is 1940. The Germans are preparing to invade Britain. The Home Guard, a volunteer militia, is hastily being assembled to defend the country. One of the Home Guard’s most important tasks is to defend the airfields. These airfields are vital for the RAF to operate, and they are also the targets of German paratroopers and glider forces.

One airfield in particular, RAF Manston, is poorly defended. It is manned by a small detachment of RAF personnel and a few armed guards. The Germans know this, and they plan to capture the airfield in the opening hours of the invasion.

The Germans launch their attack on the night of September 7th. The paratroopers and glider forces drop onto the airfield, catching the defenders by surprise. The Germans quickly overwhelm the defenders and take control of the airfield.

The Home Guard is alerted to the invasion, and they begin to mobilize. They know that it is essential to retake RAF Manston, or the Germans will be able to use it to fly in reinforcements and supplies.

The Home Guard attacks the airfield the next day. They are met with stiff resistance from the Germans, who are well-entrenched in the concrete bunkers and pillboxes that surround the airfield. The fighting is fierce, and the Home Guard suffers heavy casualties.

However, the Home Guard eventually prevails. They storm the bunkers and pillboxes, and they drive the Germans from the airfield. The Home Guard has retaken RAF Manston, and the Germans have been denied a vital foothold in Britain.

The Home Guard’s victory at RAF Manston is a major turning point in the Battle of Britain. It shows that the British people are determined to defend their country, and it gives the RAF a much-needed boost in morale.

The Bison

One of the Home Guard units that fought at RAF Manston was equipped with a Home Guard Thornycroft Bison. The Bison was an improvised fighting vehicle frequently characterised as a mobile pillbox. It was based on a lorry chassis with a concrete fighting compartment on the back. The Bison was not very mobile, but it was heavily armored and could provide valuable protection for troops against enemy fire.

The Bison played a key role in the Home Guard’s victory at RAF Manston. It was used to transport troops and supplies to the front lines, and it provided valuable fire support during the fighting. The Bison’s armor proved to be a lifesaver for many Home Guard soldiers, and it helped to turn the tide of the battle.

The Bison’s victory at RAF Manston is a testament to the ingenuity and determination of the Home Guard. It shows that even improvised weapons and vehicles can be used to great effect when defending one’s homeland.
Standard Beaverette Mk IV

Standard Beaverette Mk IV

The Standard Car 4×2, or Car Armoured Light Standard, better known as the Beaverette, was a British improvised armoured car produced during the Second World War.

Standard Beaverette Mk IV

Beaverettes were manufactured as a ‘stop gap’ measure when invasion threatened in 1940, using the chassis of civilian saloon cars. These armoured cars were only ever issued to the Home Guard and RAF airfield defence units.

Standard Beaverette Mk IV

With the Mark IV Mk IV, the glacis armour was redesigned to improve visibility.

Standard Beaverette Mk IV

The Tank Museum acquired a Standard Beaverette Mk IV in 2018. It underwent restoration before going on show.

The Standard Beaverette Mk III at the Imperial War Museum at Duxford. 

I have an old SDD 15mm model of the Standard Beaverette Mk I.

Britain’s Final Defence: Arming the Home Guard 1940-1944.

Washing the Bolt Action Home Guard Mark IV Tank

I am in the process of building a Bolt Action 28mm Home Guard force, I did want to add some armour to them with a Mark IV Male World War One tank put into service, even if it was merely as a mobile pillbox.

The Bovington Tank Museum has on display a Mark IV Male tank that was used just in this way. It was used in World War One and then presented to the Navy. When war broke out in September 1939, the Tank Mark IV (Male) number 2324 was refurbished for Home Guard duties.

Having constructed and undercoated the Mark IV Tank the next stage was a base coat of Army Green Spray from the Army Painter range. I then used a Humbrol Tank Grey 67 spray for the dark colour camouflage pattern. For the tracks I used Citadel Gorthor Brown.

I then gave the model a wash using Citadel Seraphim Sepia Shade.

I did one side at a time to try and stop the shade pooling too much.

I am aiming to use some more shades across various parts of the model.

Tracking the Bolt Action Home Guard Mark IV Tank

I am in the process of building a Bolt Action 28mm Home Guard force, I did want to add some armour to them with a Mark IV Male World War One tank put into service, even if it was merely as a mobile pillbox.

The Bovington Tank Museum has on display a Mark IV Male tank that was used just in this way. It was used in World War One and then presented to the Navy. When war broke out in September 1939, the Tank Mark IV (Male) number 2324 was refurbished for Home Guard duties.

Having constructed and undercoated the Mark IV Tank the next stage was a base coat of Army Green Spray from the Army Painter range. I then used a Humbrol Tank Grey 67 spray for the dark colour camouflage pattern.

For the tracks I used Citadel Gorthor Brown.

The blu-tak I used for the masking took a bit of the paint off.

Next step will be a wash.


Armadillo Improvised Armoured Vehicle

The Armadillo was an armoured fighting vehicle produced in Britain during the invasion crisis of 1940-1941. Based on a number of standard lorry chassis, it comprised a wooden fighting compartment protected by a layer of gravel filling the walls of the ‘fort’ and a driver’s cab protected by mild steel plates.

This vehicle was used by the RAF for airfield defence and later the Home Guard, making it an ideal addition to my Home Guard forces for Bolt Action.

Having constructed the model I gave it a white spray undercoat. After the model had it’s white spray undercoat and this had dried, I then undercoated the underside of the model with a black spray, before giving the top of the model a spray with British Armour Green.

I painted the unarmoured windows with black paint. The wheels were painted with Vallejo 70.862 Black Grey.

I then masked the model with blu-tak.

I then used a Humbrol Tank Grey 67 spray for the dark colour.

See the workbench feature on the Armadillo Improvised Armoured Vehicle.

Camouflaging the Bolt Action Home Guard Mark IV Tank

I am in the process of building a Bolt Action 28mm Home Guard force, I did want to add some armour to them with a Mark IV Male World War One tank put into service, even if it was merely as a mobile pillbox.

The Bovington Tank Museum has on display a Mark IV Male tank that was used just in this way. It was used in World War One and then presented to the Navy. When war broke out in September 1939, the Tank Mark IV (Male) number 2324 was refurbished for Home Guard duties.

Having constructed and undercoated the Mark IV Tank the next stage was a base coat of Army Green Spray from the Army Painter range.

Looking at the original photograph it was apparent that the Mark IV had a camouflage pattern that looked like the kind that was applied to early war British tanks.

Mark IV at HMS Excellent

I masked the Mark IV with blu-tak and duct tape.

I then used a Humbrol Tank Grey 67 spray for the dark colour.

I did the model in stages, mainly as I didn’t have enough blu-tak to do the model in one go.

I tried to copy the camouflage pattern as shown in the 1940 photograph.

This is the same view but with more spraying done.

The rear view. I am pleased with the way this turned out.

This is another view. the blu-tak did remove some of the base coat paint, so I will need to do some retouching up.

The next stage will be painting the tracks.


Adding the basecoat to the Bolt Action Home Guard Mark IV Tank

I am in the process of building a Bolt Action 28mm Home Guard force, I did want to add some armour to them with a Mark IV Male World War One tank put into service, even if it was merely as a mobile pillbox.

The Bovington Tank Museum has on display a Mark IV Male tank that was used just in this way. It was used in World War One and then presented to the Navy. When war broke out in September 1939, the Tank Mark IV (Male) number 2324 was refurbished for Home Guard duties.

Having constructed and undercoated the Mark IV Tank the next stage was a base coat.

Back in the day I bought a can of Team Yankee Chieftain Green which I used to spray my 15mm Team Yankee Scimitars. I also used it to spray one of my Forge World Warhammer 40K Grot Tanks as well. I decided I would base coat my Mark IV with it.

However going to the cupboard I saw that it had leaked some yellow sticky stuff, which I am thinking might be the propellant. However despite that I decided I would paint the tank with the spray. However after going for it, I realised that I wasn’t going to be able to finish the tank, as the propellant ran out.

Hmmm.

I did look at possible alternatives, attempting to find a new paint which matched the colour of Team Yankee Chieftain Green.

There are various conversion charts available online and it was clear from a couple that Vallejo Model Color 894 Russian Uniform was a match.

My local FLGS however doesn’t sell Vallejo paints, it stocks Citadel and The Army Painter range. Finding a match with those was more challenging.

In the end I decided I really didn’t need to worry. The Home Guard Mark IV (male) World War One Tank could probably be any shade of (army) green.

So I bought a can of Army Green Spray from the Army Painter range.

Back home I gave the Mark IV a base coat and I am quite pleased with the final shade.

More soon…

Constructing and Undercoating the Bolt Action Home Guard Mark IV Tank

I have a 15mm Home Guard Mark IV Male, but as I am in the process of building a Bolt Action 28mm Home Guard force, I did want to add some armour to them with a Mark IV Male World War One tank put into service, even if it was merely as a mobile pillbox.

I mentioned this idea in an article I wrote on a French themed Operation Sealion, Otaire de Vigneur.

To add a bit of diversity to my games, I also have one of Minifigs’ World War One British tanks, for use by a Home Guard unit (stolen from a local museum no doubt).

Now when I wrote that article and bought the miniature it was only an assumption and what I thought would be a nice idea, and probably had no basis in truth….

Well just shows a little historical research never hurt anyone, as the Bovington Tank Museum has on display a Mark IV Male tank that was used just in this way. It was used in World War One and then presented to the Navy. When war broke out in September 1939, the Tank Mark IV (Male) number 2324 was refurbished for Home Guard duties; according to the Bovington Tank Museum website.

Our exhibit, a male tank, was presented to the Royal Navy’s Gunnery School, HMS Excellent after the war to commemorate their help training Tank Corps gunners and it was temporarily refurbished for Home Guard duties in 1940. (Believed to have been achieved by removed parts from another tank possibly on Southsea Common.)

This photograph is from HMS Excellent in 1940.

Mark IV at HMS Excellent

One thing clear from this photograph is the disruptive camouflage they have used on the tank.

So though I thought my idea was probably if Operation Sealion had happened, I didn’t think and didn’t realise that it had in fact happened despite the fact that the Germans hadn’t invaded.

So as I also have the Royal Navy Section this gives me an excuse to use this model.

Having started looking at the model again after washing the resin and cleaning the castings, I started construction.

The tracks fitted really easily to the hull of the tank.

The sponson were simple to fit with the metal castings of the main weapons.

I added the exhaust, but decided against adding the “unditching beam” rails that are included with the kit.

Mark IVs were also the first tanks fitted with “unditching beams” by field workshops. A large wooden beam, reinforced with sheet metal, was stored across the top of the tank on a set of parallel rails. If the tank became stuck, the beam was attached to the tracks (often under fire) and then the tracks would drag it beneath the vehicle, providing grip.

The period photographs of the Home Guard Mark IV show the tank without these rails.

The next stage was to give the model a white undercoat.

Then it is on to the basecoat, where I did have some problems…

In the end I bought…

The other day I wrote about the problem I had with an old can of Team Yankee Chieftain Green and painting the base coat of my Bolt Action Home Guard Mark IV (male) World War One Tank. 

I did look at possible alternatives, attempting to find a new paint which matched the colour of Team Yankee Chieftain Green.

There are various conversion charts available online and it was clear from a couple that Vallejo Model Color 894 Russian Uniform was a match.

My local FLGS however doesn’t sell Vallejo paints, it stocks Citadel and The Army Painter range. Finding a match with those was more challenging.

In the end I decided I really didn’t need to worry. The Home Guard Mark IV (male) World War One Tank could probably be any shade of (army) green.

So I bought a can of Army Green Spray from he Army Painter range.

Back home I gave the Mark IV a base coat and I am quite pleased with the final shade.