15mm 4Ground Hotel

I mentioned in a previous post on my Sarissa Precision Old West Buildings about how much I liked the concept of laser-etched mdf buildings. Though these were the first laser-etched mdf buildings I had made, they weren’t the first ones I had bought. Some time ago I had seen some of the 4Gound 15mm buildings in a display cabinet in Waylands Forge in Birmingham alongside some Flames of War tanks and was impressed, so I purchased a couple of kits. However I hadn’t got round to ever making them up, now isn’t that quite normal for games, buy stuff, put in a cupboard and then do nothing with it… well certainly happens to me, probably too much.

However after making up the Sarissa Precision buildings and finding them very quick and easy to make, I remembered the 4Ground models that I had bought, found them and decided to put them together.

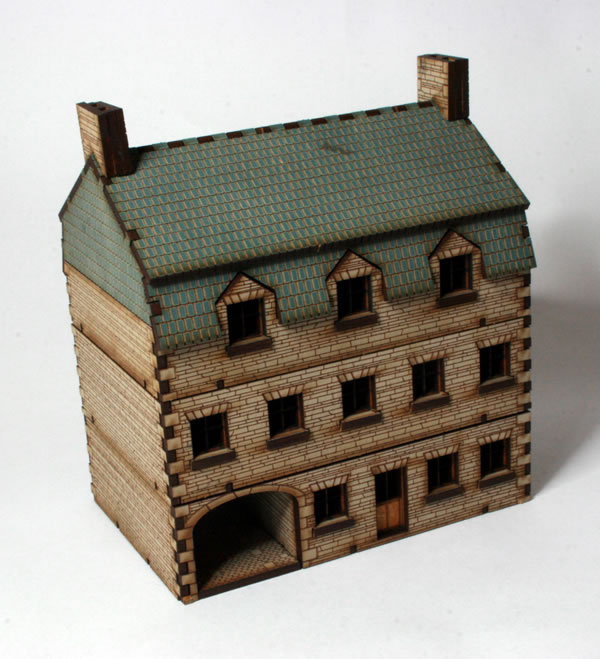
The two kits I bought were a couple of terraced houses and the hotel. The hotel was a lot more complicated to build than the Old West buildings. There were a lot more internal parts and there were even separate window ledges! Despite the added complications and more parts, it was a pretty easy build and didn’t take very long either. The instructions from 4Ground were very clear and easy to follow. The end result is quite pleasing.

I went with the pre-coloured version, so I wouldn’t need to paint it.

It might need a bit of weathering, and it also needs some signage and posters. It’s nice that the instruction sheet does have these, that can be cut out and stuck to the mode.

Overall these are really nice models and very easy to put together. The only thing I have mixed opinions on is that you can place models inside the building on all the different floors. This is obviously very useful from a gaming perspective, however I also think it has a rather negative impact on the look of the model.

Will I get some more? Yes I will. I think I may get some of their Old West buildings and 28mm World War Two buildings for Bolt Action.

Doing the Decals

British Decals

I haven’t quite worked out the process of adding decals to my Flames of War tanks. I am not sure if I should give the models a wash first, or after adding the decals.

As for the actual process of applying the decals, there are quite a few articles on the web (and in rules and magazines) on how best to apply decals.
Battlefront even have a video…

…which I must watch at some point.

The process I think I am going to try is to paint the areas for the decals with a gloss varnish. Once that is dry, apply the decals and allow to dry. Then I am going to apply a decal fixer. After that is dry and at this point I will add the weathering to the model. The final stage will be to add a matt varnish to the whole model.

The other problem I have, is despite reading a range of articles on the subject, I am still not entirely sure what decals to apply and where.

There is this article on the Battlefront website, but I know that even after reading this I may get the placement of the insignia just plain wrong.

I think I might need pictures of what the finished article looks like. Still a fair amount of work to do.

Ork Kil Krusha Tank

Ork Kil Krusha Tank

This model from Forge World is one of my favourite Ork models they have made. I realised recently that since I undercoated it, it has spent way too long on the workbench… well in storage and I really should start thinking about getting it painted and finished.

They key for me is to not only give it a paintjob worthy of the model, but also one that isn’t going to take all my time and forever to get done.

I don’t want to go down the “black” armour route, likewise I am not sure if I want it red either! I might consider doing something similar to the brown-orange look I have done with the Fighter Bommer.

As for the engines, my usual method with Ork vehicles is to paint them black and then drybrush with Tin Bitz and Boltgun Metal. I might try a different method, one that I first tried on my Victorian Science Fiction Tunneller, where I gave the metal parts a basecoat of Boltgun Metal, then washing it with Citadel Shade: Nuln Oil. If I go down this road, then I will ensure that the Ork engines are a lot more dirty and rusty. As well as using shades, washes, I have a few of the Forge World weathering powders somewhere and this might be an ideal opportunity to use them. Of course if I use weathering powders then I will need a method for sealing them in. This is not one of my strongpoints, as I rarely varnish my models.

The next stage will be to remember which box I put it in…

See the full workbench feature on the Ork Kil Krusha.

King John – Ruler Class Battleship

I have been painting the Kingdom of Britannia Naval Battle Group for Dystopian Wars.

Having finished painting King Richard III and used it in a few games, I realised that I may need some reinforcements. The first of these ships is another Ruler Class Battleship, this one will be called King John.

Unlike King Richard III, this only has three turrets, but does have a shield generator.

Next stage will be a white undercoat.

Prussian Empire Blucher Class Dreadnought

I mentioned in a previous post that I had got some Prussian reinforcements. One of the three blisters I got was a second Blucher Class Dreadnought to complement the first one I have finished.

I did think about changing the turrets to generators, but in the end maintained the four turret model that I had done with the first one.

One of the reasons I write up how I paint my models, is partly to inform others, but also to inform myself. So I will be using the workbench feature I wrote up on the first model to paint this second model. It will remind me of the paints and processes I used.

Prussian Tower Set

Here is the Prussian Tower Set out of the blister pack.

For many years, the Prussian Empire has been able to intimidate neighbouring territories with their overwhelming strength and infectious influence. Their significance is perpetuated in their Tower Set – a menacing piece of architecture that will undoubtedly serve you well in battle.

You get the four variations included, Communication, Flak, Shield and Tesla.


Dystopian Wars Prussian Bunker

The Dystopian Wars Prussian Bunker is a large resin model.

Dystopian Wars Prussian Bunker

I was surprised by the lack of detail on this model compared to other Dystopian Wars models I have in my collection. I suspect that this was intentional, especially for the Prussian Bunker which has a utilitarian feel to the model. The other bunkers for the other nations appear from the advertising material to be more “fancy”.

Dystopian Wars Prussian Bunker

The Prussian Bunker consists of two pieces of resin, the roof and a hefty main structure.

Dystopian Wars Prussian Bunker

You also get metal turrets.

Prussian Bunkers

To support my Prussian ships I bought a Bunker Complex and the Tower Set. These are really nice resin castings which add a different dimension to games of Dystopian Wars.

The bunker complex to me combines elements of the Maunsell Forts that the British placed around the UK in World War Two and German Atlantic Wall bunkers from the same era.

Prussian Bunker Complex

Befitting of the largest empire in Western Europe is the Prussian Empire Bunker Complex. This fortifying structure will cause nightmares for your opponents as they try, in vein, to break down its impeccable defences.

I had a bit of trouble finding a Prussian Bunker and had considered getting the French Bunker or even the Russian one. However as I had Prussian ships I wanted a Germanic feel to the architecture and to fit in with the naval vessels.

I also got the towers, and they also for me are reminiscent of the Maunsell Forts, but also the Martello Towers of the Napoleonic Wars.

Prussian Empire Towers

For many years, the Prussian Empire has been able to intimidate neighbouring territories with their overwhelming strength and infectious influence. Their significance is perpetuated in their Tower Set – a menacing piece of architecture that will undoubtedly serve you well in battle.

Though I quite like the Prussian towers, I think Spartan Games missed a trick with the design of the Kingdom of Britannia Towers, as they look like castles, whereas I think they should have gone down a Martello Tower look.

I think the question is what colour should I paint these, thinking that grey is probably going to be the best choice.

I’ve not had a chance to really read or reflect on the rules, but not sure how these will play out in a game. They would appear to be either going to deprive the enemy part of the table on which the game is been played, or really need to be the main objective of the scenario, as in destroy the bunker.