Building the 15mm British Combat Vehicle Reconnaissance (Tracked) – Team Yankee

For Christmas I was kindly given not only the Team Yankee Iron Maiden book I also got a box of the newly released 15mm British Scorpion or Scimitar Troop.

The British Army Of the Rhine had three tracked reconnaissance regiments. The recce troops of the first two were equipped entirely with Scimitar reconnaissance vehicles, while the recce troops of the third mixed Scimitars and Scorpions together.

The box contains four sprues and unit cards for use with Team Yankee. Each sprue allows you to build either a Scorpion or a Scimitar. I have made them up as two Scorpions and two Scimitars.

Here are the two Scorpions.

The FV101 Scorpion is a British armoured reconnaissance vehicle. It was the lead vehicle and the fire support type in the Combat Vehicle Reconnaissance (Tracked), CVR(T), family of seven armoured vehicles. Manufactured by Alvis, it was introduced into service with the British Army in 1973 and served until 1994.

Starting to build them they go together really nicely. Unlike “proper” plastic kits, these have a smaller number of parts. The tracks for example are in one piece, whereas the Airfix 1/72nd Scorpion had separate wheels and tracks.

As I mentioned in a previous post I added some ball bearings to the models to add weight.

For one of the Scimitars I added a commander figure and some extra stowage.

The FV107 Scimitar is a similar armoured reconnaissance vehicle (sometimes classed as a light tank) also used by the British Army. It was manufactured by Alvis in Coventry. It is very similar to the FV101 Scorpion, but mounts a high velocity 30 mm L21 RARDEN cannon instead of a 76 mm gun. It was issued to Royal Armoured Corps armoured regiments in the reconnaissance role.

Here are the two Scimitars.

I gave the models a white undercoat and the next stage will be a basecoat of Team Yankee Chieftain Green.

Cleaning the LVT-4 Buffalo Amtrac

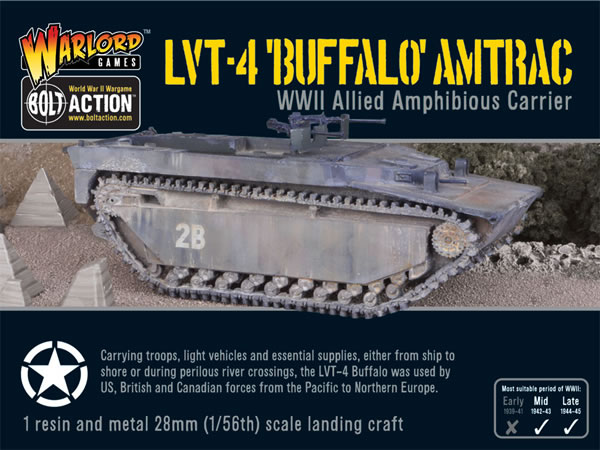
I have started working on my Warlord LVT-4 Buffalo Amtrac for Bolt Action. The LVT-4 is a 1/56th scale 28mm resin and metal kit and comes in a box with a picture of the completed model on the front.

Bolt Action Commando LVT-4 Buffalo Amtrac

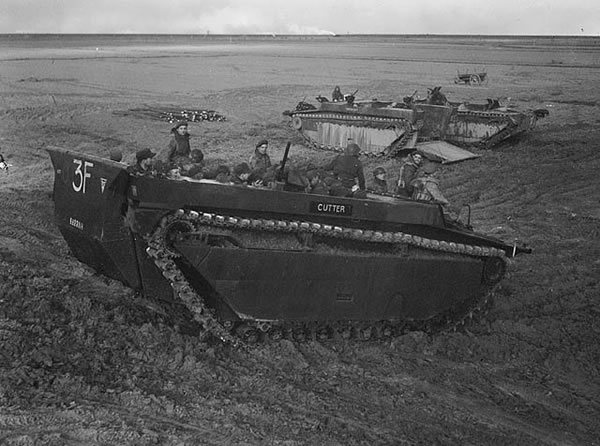
The Landing Vehicle Tracked (LVT) is an amphibious warfare vehicle and amphibious landing craft, introduced by the United States Navy. The Marine Corps and Army used several LVT models during World War II. Five hundred were provided to the British Army. Originally intended solely as cargo carriers for ship to shore operations, they evolved into assault troop and fire support vehicles.

The model comprises four resin parts, the hull, two tracks and the rear ramp.

Landing Vehicle Tracked (LVT)

Landing Vehicle Tracked (LVT)

There are metal components for the mudguards, benches and machine guns.

Landing Vehicle Tracked (LVT)

The resin pieces were nice clean castings with virtually no flash and minimal casting “plugs” that needed to be removed. I did very little cleaning, and as I went over the castings I was impressed with the quality of the castings.

I washed the resin in warm soapy water to remove any remaining mould lubricant.

Landing Vehicle Tracked (LVT)

The next stage will be glueing the pieces together.

I am in the process of building a Commando team to fight alongside my partisans for games of Bolt Action. The force is taking its time to put together, but now I have transport for them.

As well as this model, the Commandos plastic boxed set I also have a couple of blisters, a Mortar Team and the Vickers MMG Team.

Heavier

One of the things I dislike about the new plastic 15mm kits from Battlefront is the lack of weight the models have compared to older metal kits and even the resin ones have.

With my recent addition of Team Yankee British Scorpion and Scimitar tanks I started to think about I could make them heavier.

My initial choice was some lead (or lead-free) weights of some kind, there isn’t much space in the models so any extra weight would need to be quite dense (so heavy weight but not very big). The obvious choice was fishing weights, but I couldn’t find any that were small enough for the models.

Another idea was some lead sheet, again small, but heavy.

In the end I compromised and went with Weldtite 5/32-inch British Made Case Hardened Bearings – 750 Pieces which I ordered from Amazon.

These are very small and just under 4mm in diameter.

I glued them into the hulls of the light tanks with some super glue before checking there were no loose bearings. I then glued the hull together.

They are not really heavy, but certainly better than they were and I fell less likely to be blown over by a strong breath in a game of Team Yankee.

So do you add weights to your plastic tanks and if you do, what method do you use?

15mm British Combat Vehicle Reconnaissance (Tracked) – Team Yankee

For Christmas I was kindly given not only the Team Yankee Iron Maiden book I also got a box of the newly released 15mm British Scorpion or Scimitar Troop.

The British Army Of the Rhine had three tracked reconnaissance regiments. The recce troops of the first two were equipped entirely with Scimitar reconnaissance vehicles, while the recce troops of the third mixed Scimitars and Scorpions together.

FV107 Scimitar

The FV101 Scorpion is a British armoured reconnaissance vehicle. It was the lead vehicle and the fire support type in the Combat Vehicle Reconnaissance (Tracked), CVR(T), family of seven armoured vehicles. Manufactured by Alvis, it was introduced into service with the British Army in 1973 and served until 1994.

The FV107 Scimitar is a similar armoured reconnaissance vehicle (sometimes classed as a light tank) also used by the British Army. It was manufactured by Alvis in Coventry. It is very similar to the FV101 Scorpion, but mounts a high velocity 30 mm L21 RARDEN cannon instead of a 76 mm gun. It was issued to Royal Armoured Corps armoured regiments in the reconnaissance role.

This is the box art which shows two Scorpions and two Scimitars patrolling (probably) a West German town.

The box contains four sprues and unit cards for use with Team Yankee. Each sprue allows you to build either a Scorpion or a Scimitar.

Starting to build them they go together really nicely.

More soon…

Steaming along

I am making progress on my Sarissa Precision Old West steam engine. The first part I attempted was the tender.

This went together really easily and is a clever design, turning what is flat pieces of MDF into a three dimensional model. Laser-cut MDF models use to be mainly buildings, or thing with straight lines, however companies like Sarissa Precision have taken it to the next level, using flat MDF to create complicated curved models such as the steam engine.

It has to be said that the tender is more akin to the buildings with slab sides, though I do like the angled tender sides at the top.

It wasn’t the easiest of builds and I found the instructions slightly confusing, but I got there in the end.

Bolt Action Commando LVT-4 Buffalo Amtrac

I was pleased to get for a present the Warlord LVT-4 Buffalo Amtrac for Bolt Action.

Bolt Action Commando LVT-4 Buffalo Amtrac

The LVT-4 is a 1/56th scale 28mm resin and metal kit and comes in a box with a picture of the completed model on the front.

I am in the process of building a Commando team to fight alongside my partisans for games of Bolt Action. The force is taking its time to put together, but now I have transport for them.

I am also going to use these models as UNIT troops for some Doctor Who scenarios that I have been thinking about, the LVT will probably not be used for these games.

As well as this model, the Commandos plastic boxed set I also have a couple of blisters, a Mortar Team and the Vickers MMG Team.

Commando LVT-4 Buffalo Amtrac

The Landing Vehicle Tracked (LVT) is an amphibious warfare vehicle and amphibious landing craft, introduced by the United States Navy. The Marine Corps and Army used several LVT models during World War II. Five hundred were provided to the British Army. Originally intended solely as cargo carriers for ship to shore operations, they evolved into assault troop and fire support vehicles.

So what’s going on here then?

One of my limited number of purchases from the wargaming show at the Tank Museum was a blister pack of police officers from Artizan Designs Thrilling Tales range, PLP586 Long Arm of the Law.

They were in a bargain bucket and cost just £1.00 which is a lot less the list price of £8.50.

These are really nice castings, here is the manufacturers picture.

img1666

I am intending to use them in Victorian Science Fiction games.

Steaming

So in the Old West one thing you need to do, is to rob a train! However in order to play this scenario on the table you will need a train!

I have been thinking for a while about getting a train for some Old West games. First thoughts were to get a toy train and repaint it, but knowing my history in buying stuff and not painting it, I decided that if I was going to go down this route then I would have to leave it until I had the time to do it justice. Also getting one which was the right scale and didn’t look too much toy like was also a challenge.

I also thought about getting the Dixon Miniatures model, which was nice. Another however was that this was a metal kit which means nice and heavy, but again experience tells me I would find the construction of such a kit a bit of a challenge.

So I was intrigued by the new Sarissa Precision railway range which includes an engine, various wagons and carriages, as well as track. All the models are made from laser cut and etched MDF. I was lucky enough to receive the engine and tender from the range as a present.

At a show last year I saw another manufacturer’s range of 3D models made from laser cut and etched MDF. There were old style trucks and cars, as well as tanks and armoured vehicles. The layered approach allowed for curved sides and bonnets. This was quite a paradigm shift in the use of the material, mainly used for flat surface models such as buildings.

The Sarissa train uses a similar construction methods for the boiler and from the pictures on the packaging and the website looks quite effective.

I am wondering if I can hide the layered effect on the boiler to make it look more like boiler plate than layers of MDF.

So at this time, it’s still in the shrinkwrap…

Painting the roof

After my success with painting (or colouring) my Gaslamp Alley building I looked back over my Old West buildings from Sarissa Precision and decided to paint the roof.

Looking back over a previous post back then I reflected on how to do this. For the roof I used 995 German Grey, which I did water down, to avoid painting out the etching and let it come through the paint.

I think I might add some weathering and detail to the roof later.

Walking down Gaslamp Alley

One of recent purchases was a couple of Sarissa Precision buildings, Victorian brick buildings, part of their Gaslamp Alley range. I had bought the terrached house and the terraced shop. Here is the model from the Sarissa website.

Gaslamp Alley Terraced House

The Sarissa Precision models are laser cut MDF and come plain. I do quite like how the 4Ground models come pre-coloured and though I have few Sarissa Old West buildings, as these are made from wood, the plain MDF look works okay.

The Gaslamp Alley models are brick, so I originally decided when I was going to put mine together, I would paint them later. So when I read the instructions that it was suggested to paint the window frames and doors (which were etched onto card) and the walls before gluing them together, it meant I had to think quickly about how to paint the walls. The instructions did advise about doing it sparingly, my concern was that would the paint cover the eteching.

I took some Vallejo paint red brick colour and watered it down. I was quite apprehensive about the initial result, so had started with the chimney. However after it dried I was quite pleased with the final result.

Gaslamp Alley Terraced House

After the walls were dry I picked out some individual bricks with the unwatered down paint, and some varied brown paints.

Gaslamp Alley Terraced House

After this I painted all the walls. I wasn’t sure about the window frames, decided a wood effect would be okay, so I used a watered down brown paint and almost drybrushed it.

The model went together really easily, though with the way the walls fit to the floor, I wasn’t sure if I should fix the walls first and then put them in the floor. In the end I went with taking it one wall at a time, gluing it into the floor, and doing all four walls in one sitting, so that there was some movement whilst the glue was still wet.

Gaslamp Alley Terraced House

I was quite pleased with the end result.

Gaslamp Alley Terraced House

The building was much deeper than I thought it would be and also much bigger. I really like the model and am now looking forward to building the shop that I got at the same time. I am also adding the corner pub to my shopping list, and thinking I should get a bundle of the houses too, so I can have a proper street.