Sopwith 1½ Strutter

This Sopwith 1½ Strutter was on display at RAF Cosford.

The Sopwith two-seater, quickly named the 1½ Strutter because of the unusual arrangement of its central mainplane bracing struts, was designed in 1915 as a high performance fighting aircraft. It was ordered in large numbers for both the Royal Flying Corps and the Royal Naval Air Service and it was widely used by escadrilles of the French Aviation Militaire as well as Belgian and United States air forces.

This aircraft was built to original Sopwith factory drawings and flown in 1980.

More photographs of the Sopwith 1½ Strutter.

Fixing the missing part

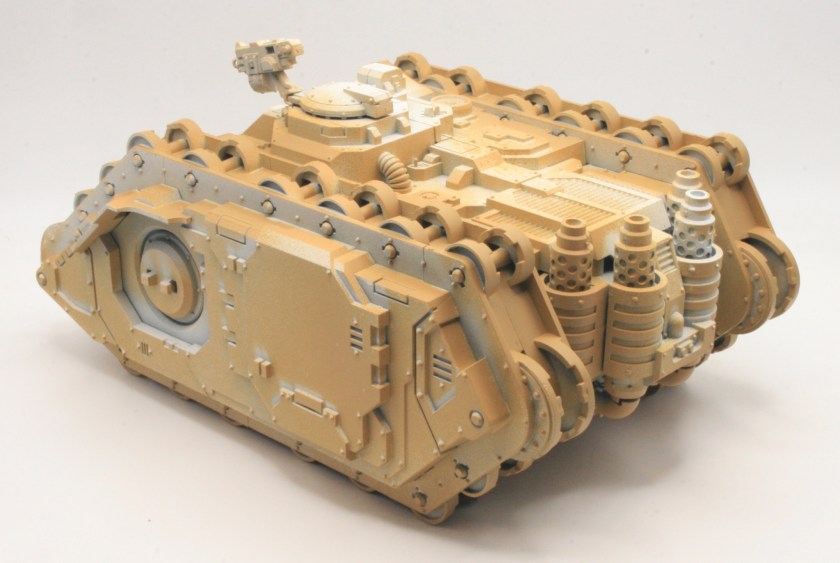
The Land Raider is an Imperial main battle tank and troop transport which serves as the “armoured fist of the Space Marines.”The Land Raider’s heritage predates even the founding of the Imperium of Man, yet it remains the single most destructive weapon in the Adeptus Astartes’ arsenal. The Mark IIb Land Raider Phobos is one of the earliest marks of the standard pattern of Land Raider. The Mark IIb Land Raider Phobos is the only pattern of the standard Land Raider Phobos that uses the older armoured sponsons, as they do not allow the weapons they hold to fully rotate.

I got a Forge World MkIIB Land Raider and was originally painting it up as a Grey Knights Land Raider in desert camouflage.

I wrote up some reflections recently on my MkIIB Land Raider, on the current state of the painting and what I needed to do next.

I also noticed that there is a part missing the, the hull top front bolters. I will have to find where I put that piece. Well I was pleased to find the missing parts and these have now been reunited with the Land Raider. They were a set of twin bolters and a armoured shell for the bolters.

At the point though of repainting I didn’t glue in the armoured shell, as I knew I would need to paint the bolters first before affixing the shell.

The model was given a white undercoat and then a new basecoat of Daemonic Yellow spray from Army Painter.

I then painted the twin bolters with Leadbelcher.

When it came to fixing the shell in, I had a bit of trouble fitting it into place. It was a bit of a tight fit.

So much so trying to fit the piece I damaged the paintwork on the armoured shell.

I eventually managed to glue in the armoured shell. I then touched up the damaged areas with a brush and some fresh paint.

FV 4005 Stage 2

The Tank Museum is a collection of armoured fighting vehicles at Bovington Camp in Dorset, South West England. I visited the Tank Museum before in 1984, 1997, and 2016, but recently made a return visit.

On the approach to the museum is the FV 4005 Stage 2. This is a Centurion variant.

An experimental tank destroyer with a 7.2-inch mm gun L4, which was a modified version of the BL 7.2-inch howitzer.

It’s not only a huge gun, but also a huge turret. However as a SPG artillery piece, this isn’t too critical, no need to be hull down on a hill ridge.

The project started in 1951/52,and developed in July 1955. It used a lightly armoured, fully enclosed and traversable turret on a Centurion hull.

It did look a little worse for wear, looking at the photograph on Wikimedia, you can see at one point it was in much better condition.

FV4005
Morio, CC BY-SA 4.0, via Wikimedia Commons

Now there is a lot more rust on the tank.

Reflecting on the Rukkatrukk Squigbuggy

On one of my recent posts I got a comment from Katie (@Lawgirl04) about another of my  workbench models, the Ork Rukkatrukk Squigbuggy.

Sorry to comment here — but I found your Rukkatrukk Squigbuggy posts, and I’m dying to know if you finished it? Also, I appreciate your tip on how you painted the buggy without gluing down the roll bar. I am just starting this project (and I’m VERY new to warhammer), and it’s nearly impossible to find tips/tricks for painting this squigbuggy. If you post more on this item, any tips are appreciated!! Thanks for the great content!

As the comment wasn’t relevant to the model in the blog post, I thought I would post the comment in the blog in a new posting.

I did look over the workbench feature of the Rukkatrukk Squigbuggy to see how far I got with the model.

Well not very far at all to be honest.

Not sure what I would do next. I think I will use some Contrast paint on the main chassis, and then use different colours for the bodywork. I will also be using Leadbelcher as the primary colour on the metallic areas, such as the buzzsaw.

Sopwith Pup

The Sopwith Pup is a British single-seater biplane fighter aircraft built by the Sopwith Aviation Company. It entered service with the Royal Naval Air Service and the Royal Flying Corps in the autumn of 1916. With pleasant flying characteristics and good manoeuvrability, the aircraft proved very successful and was regarded by many pilots at the perfect flying machine.

This Pup was at RAF Cosford. Built in 1916 and flew on the Western Front. It was extensively rebuilt this plane was recovered from France around 1960.

It last flew in 1976.

Many thought the name “Pup” was undignified and wanted the aircraft to be referred to as the Sopwith Scout, which did more than anything else to ensure the name Pup was used.

More photographs of the Sopwith Pup.

Toning down the purity seals

One model I got many years ago, well in 2006, was a Forgeworld Razorback the one with the much bigger turret, which I much prefer over the plastic kit version that you could get in the shops back then. I recently retrieved it from storage and decided that I would try and finish painting it. I was using Tausept Ochre as the base coat, however having liked the paint scheme I was using on my Deimos-pattern Rhino, I decided that I would paint the Razorback in the same scheme. Having sprayed the underneath of the model with Citadel Zandri Dust. I gave the model a basecoat of Army Painter Daemonic Yellow. This was followed with Leadbelcher for painting the exhausts and weaponry. The next step was painting the iconography and purity seals. I then slightly messed up the shading on the model, but think I managed to get the effect I was looking for. For the next stage I used some Citadel Layer Yriel Yellow. I took a large brush and gave the model, what I would call, a heavy drybrush. The next step was to paint and highlight the iconography. I then glued the tracks to the Razorback using superglue.

I also took the time to brighten up the purity seals and other iconography after it was dulled down by the shades and washes. I also highlighted the purity seals with some White Scar paint.

However, as with my Repressor, I think I overdid this, they are too bright for the model. I decided to dull these down a bit with some Citadel Seraphim Sepia Shade.

I think that this works better than bright white purity seals.

See the workbench feature on the Razorback.

Consolidated PBY Catalina

The Consolidated PBY Catalina is a flying boat and amphibious aircraft that was produced in the 1930s and 1940s. It was one of the most widely used seaplanes of World War II. Catalinas served with the RAF, as well as every branch of the United States Armed Force, and in the air forces and navies of many other nations. The last military PBYs served until the 1980s. The aircraft continues to fly as a waterbomber (or airtanker) in aerial firefighting operations in some parts of the world. None remain in military service.

This PBY Catalina was on display at RAF Cosford.

This was a Royal Danish Air Force Catalina.

I have always found this an interesting plane design. I once had a 1/300th metal model of it, which never stayed together due to the way the wings are connected to the fuselage. That was a badly designed model kit.

More photographs of the Consolidated PBY Catalina.

Detailing the Deimos Pattern Rhino

The Rhino is the most widely used armoured personnel carrier in the Imperium. Based on ancient STC technology, the fundamental design is robust, reliable, and easy to maintain, with an adaptive power plant that can run off a wide variety of fuels.

I bought the plastic Deimos Pattern Rhino when it came out in the summer, you can see the workbench for that Rhino here.  I was lucky enough to get a second Rhino for a Christmas present. The model has many more parts and is a more detailed kit than the original plastic Rhino kit that came out in the 1980s. I constructed the model to the instructions, though I left the tracks off to paint separately. I gave the model an undercoat of Citadel White Scar. I gave the model a couple of light coats of Daemonic Yellow.

I  painted the cupola bolter, and the exhausts, with Leadbelcher.

Deimos Pattern Rhino

This Rhino has a single cupola bolter, with my first Deimos Pattern Rhino I gave it two cupola bolters. The rear view of the Rhino.

Deimos Pattern Rhino

I did a heavy drybrush of the tracks with Gorthor Brown, having initially given them a basecoat of a spray of Mechanicus Standard Grey.

See the workbench feature on the Deimos Pattern Rhino II.

Lockheed SP-2H Neptune

 Lockheed SP-2H Neptune

The P-2H Neptune is a land based maritime patrol and anti-submarine aircraft. It was designed during WWII and is powered by two piston engines and two jet pods to assist in take-off and for extra power when required to reach submarine contacts.

 Lockheed SP-2H Neptune

Its first flight was on 15 May 1945 and squadron delivery was in March 1947.

 Lockheed SP-2H Neptune

More than 1100 were built and no other post war maritime patrol aircraft has been built in such large numbers.

More photographs of the Lockheed SP-2H Neptune.


Detailing the Deimos Pattern Predator Battle Tank

The Predator is perhaps the best known and most widespread variant of the basic Rhino chassis. Augmented with superior armour and firepower, it entirely sacrifices the Rhino’s troop transport capacity in favour of ammunition and generators for its formidable weapon systems. 

Having got this kit for Christmas, I started putting the model together. For painting I kept the sponsons separate and I can easily remove the turret as well. I gave the model an undercoat of Citadel White Scar. I gave the model a couple of light coats of Daemonic Yellow.

I  painted the main weapon, and the exhausts, with Leadbelcher.

Deimos Pattern Predator Battle Tank

I had already painted the sponson weapons with Leadbelcher.

Deimos Pattern Predator Battle Tank

I had a few problems with the turret not fitting the turret hole, so I did some light filing of the edges of the turret and the hole for a better fit.

Deimos Pattern Predator Battle Tank

I did a heavy drybrush of the tracks with Gorthor Brown, having initially given them a basecoat of a spray of Mechanicus Standard Grey.

See the workbench feature on the Deimos Pattern Predator Battle Tank.