Mike and Sean give you a brief look at the new Open Fire starter set. Packed with new plastic models and a streamlined set of rules, it’s the perfect entry point into World War II wargaming.
Category: flames of war
The Comet is on its way…
Battlefront have shown a preview of the new plastic Comet boxed set.

One of my most popular blog posts is from 2011 when I discussed the then forthcoming Battle of Bulge supplement.
I made the request
I would like to see two tanks in particular, the M24 Chaffee and the British Comet. These tanks are currently not in the FoW range.
The Chaffee arrived in 2012, but it has taken a little longer for the Comet to arrive. As with many of the new models from Battlefront it is a plastic kit. It looks great and the instructions simple, resulting in an effective looking model.

The Tank, Cruiser, Comet I (A34) was a British cruiser tank that first saw use near the end of World War II. It was designed to provide greater anti-tank capability to Cromwell tank squadrons. It was armed with a 77mm HV, a derivative of the 17 pounder, with the result it was one of the few British tanks with the firepower to challenge late war German designs.

15mm US Kodiak Assault Walker
At Reveille, the recent Bristol show I spent a little time looking at the models and talking to the guys at Clockwork Goblin Miniatures about their great 15mm (and 28mm) alternative World War Two figures, walkers and tanks, War Without End.
In the end I bought a single blister, a 15mm US Kodiak Assault Walker, though I was tempted to spend a lot more money at their stall.
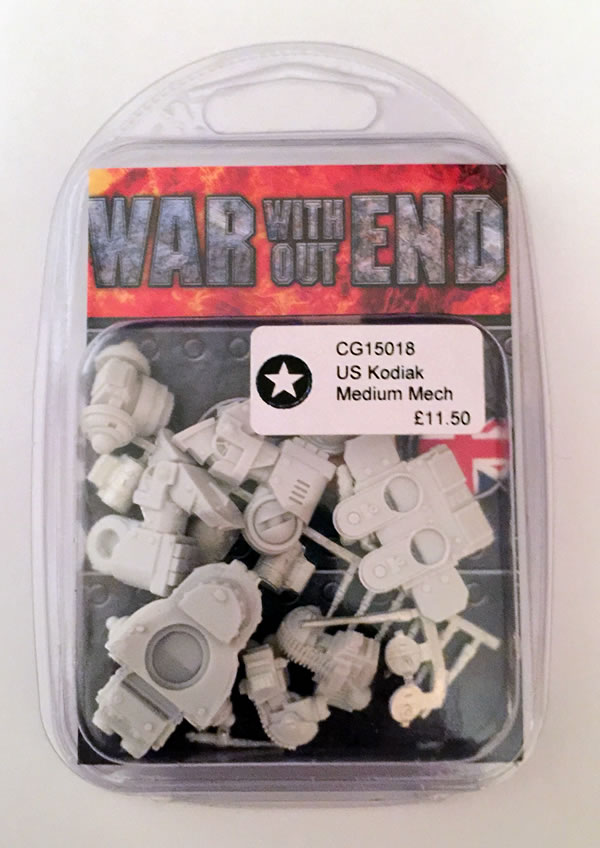
It looks like a lovely clean casting and by using 3D computer design, you have a really good sculpt with the sort of lines and shapes you would expect from a factory manufactured vehicle. This is a really nice alternative model for World War Two games and at 15mm perfect for Flames of War.

I am thinking lots of possible scenarios, including using the Kodiak Assault Walker as an objective for a raid behind enemy lines.
The next stage will be putting it all together.
The Comet is coming
One of the most popular posts on the blog is an article I wrote back in 2011 on the Battle of the Bulge reporting on the news that Flames of War was going to release models and rules for the Battle of the Bulge.
Then I said
I would like to see two tanks in particular, the M24 Chaffee and the British Comet. These tanks are currently not in the FoW range.
In June 2012 we saw that we were going to get Flames of War Chaffee tanks that were eventually released in September, however still no sign of the Comet.
So you can guess I was quite pleased to see the news from FlamesCon 2014 that Flames of War are going to release a 15mm Comet, in plastic.

It looks like a really nice model and I might get a few.
Why such a fascination, well I suspect that it was because I bought and made the Matchbox Comet many, many years ago.
Variations on a Whippet

As part of their releases for Flames of War The Great War, Battlefront have released a 15mm scale Whippet tank.
Though originally envisioned with a rotating turret, the production model had an armoured housing for three to four 303 Hotchkiss machine guns, which could be relocated between four gun ports. Approved in June 1917, roughly 200 vehicles were produced starting in October 1917.
Unlike the large crew of the Mark IV, the Whippet managed with a standard crew of three: a commander, driver and gunner. Given the gunner was responsible for manning both machineguns (which could point forward, left, right and rear), sometimes a second gunner was squeezed in.
It looks like a very nice model and well sculptured. Lots of detail and a good casting.
I do think that this model would make for a great base for vehicles for an alternative Great War. It could be converted into a turreted tank, or a self propelled gun. One other idea is to use the models for A Very British Civil War background. There are quite a few models in the Flames of War range that could be used for a 1920s or 1930s civil war within the United Kingdom.
Flames of War Great War

This week sees the release of the Flames of War Great War supplement. You can either buy a boxed set which comes with the supplement, or you can buy the August issue of Wargames Illustrated, that comes bundled with the supplement for “free”. Alongside the rules there are various models, including two boxed starter sets.
I got my copy of Wargames Illustrated yesterday and spent some time reading the supplement and the plethora of articles in the magazine itself on the new supplement and the rules.
The models look really nice, this is the Mark IV Male.

You can compare that detailed model with the 15mm version I bought many years ago. This version is a lot more detailed, looks much better and really captures the feel of this, one of the first tanks. As well as tanks there are infantry and artillery. I really quite like the introductory boxed set available, Mitchell’s Marauders.

Your rifle company is well-equipped for assaulting and crushing the enemy. Prepare your assault with your Mark IV tanks. They will pulverize Jerry’s gun nests with high-explosives and rake his trenches with machine-gun fire. Then send in your highly-trained rifle platoons to clear out the trenches and breakthrough.
The box provides all you need for an introductory game, infantry, tanks and artillery.
There is also a German boxed set available. Though that boxed set has the A7V, you can of course use captured British tanks for your German forces.

I feel I can’t say too much on the rules, as I have not had a chance for a game with them…
The articles within Wargames Illustrated cover a range of issues, one of the interesting aspects is debunking the myth that the Great War was just about muddy trenches. Towards the end of the war there were more battles that were about movement and breakthroughs across new areas that hadn’t been torn apart from relentless artillery barrages.
With the 100th anniversary of the Great War this month, I can see these models proving popular. For the future I hope we can see some more models, notably missing are armoured cars, which though played little part in the trenches, were well utilised in other theatres of the war.
Repainting the King Tiger
I started to paint the camouflage on my old SDD German Königstiger. I used Chocolate Brown (872) from the Flames of War German Armour Paint Set.
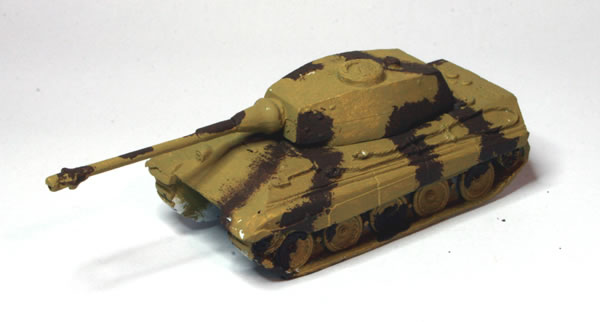
Though following the painting guidelines from the German Armour paint set, I think the brown is too brown and needs to be more red. I think I am going to recover the dark brown and then use Cavalry Brown (995) which is redder and will I hope look better.
In the first instance though I painted over the brown and will start again.
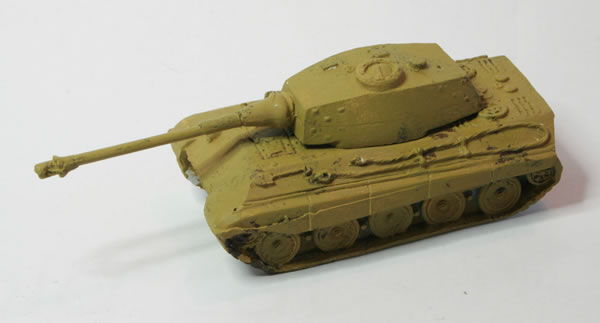
One of the advantages of using an older model such as this, it allows you to make mistakes and not worry about ruining a model. In the end I will probably use this more as scenery, maybe a knocked out King Tiger, rather than as an actual gaming model.
15mm Normandy Village

A larger photographs (click for the larger version) of my 15mm Normandy Village. As well as Battlefront roads and houses, I also have in there some of the nice 4Ground laser etched wooden buildings.
British Normandy Village Defence
British armoured forces defend a Normandy Village under a counterattack from German Forces.

A Sherman Firefly takes cover, behind a small hill.

The rest of the Sherman platoon starts to move forward.

Models from Simon’s collection, scenery from mine.
15mm Normandy Village
More photographs of my 15mm Normandy Village for Flames of War.

You can imagine that this would be the view from the gun camera of an RAF ground attack Typhoon attempting to flush out some entrenched Germans. You can see I have used the outbuildings to complement the Flames of War Normandy houses.

Here is an overhead view of the buildings.

As well as Battlefront roads and houses, I also have in there some of the nice 4Ground laser etched wooden buildings.