This is the second in a two part battle in which the Orks forces of Warlord Grazzarg Furback invade Cygnus IV, an Imperial agriword in sector 467. Check out the battle report of the first part.
Pre-Game Setup
The first game consisted of a meeting engagement, each side was allowed 2000 points and one detachment on the table, other detachments would use the reserves rules from the Battles Book. The Orks won the first game quite convincingly and therefore entered the second game with 3000 points, whilst the Imperial forces had 2000 – though they had the advantage in that all the Imperial forces were on the table, whilst only one Ork detachment would be on the table on turn one.
The terrain consisted of a lots of hills, some trees a variety of industrial buildings and an Imperial Shrine.
Before the battle a view of the battlefield from the Ork position, with a small village in the background and industrial units in the foreground.

The centre ground, dominated by an Imperial Shrine.

Imperial Shrine, was to become the focus of the battlefield on the Ork left flank.

Another view of the battlefield, this tome showing a variety of hilly areas.

Starting Morale
Ork Morale: 66
Imperial Morale: 41
Turn One
All the Imperial forces were on the table from turn one, the Orks were allowed one detachment, they chose a Kult of Speed who were immediately placed on assault.
The first Orkish detachment on the table was a Kult of Speed comprising in the main Wartraks, Buggies and Skorchas.

The first Orkish detachment on the table was a Kult of Speed comprising in the main Wartraks, Buggies and Skorchas.

Imperial Space Marine detachment comprising Bikes, Attack Bikes, Landspeeders and Razorbacks advance towards the hill with a bunker on the top.

Close-up of the Space Marines.

Imperial Baneblades advance to the Orkish lines.

The Imperial reconnaissance patrol (decimated in the last game) this time were reinforced with Leman Russ Demolishers and Hellhound Crocodiles.

Turn One Morale
Ork Morale: 66
Imperial Morale: 43
With the holding of two cleanse objectives the Imperium found that their morale had increased at the end of turn one.
Turn Two
The beginning of turn two saw the arrival of four Ork detachments.
The Space Marines advance over the hill (the advantage of skimmers) and head towards the Imperial Shrine.

View from the Imperial right flank.

An Ork Kult of Speed enters on the table, comprising mainly BikeBoyz and Trukks, it also contains Mekboy Speedstas and some Heavy Ork Trukks.

Close-up of the Heavy Ork Trukks.

Ork Battlefortresses laden with Ork Boyz (so many that the Stormboyz have to travel by their jump packs).

Imperial Bunker, containing a cleanse objective for the Imperium.

The first air attack of the game sees three Ork Bommerz launch an attack against the BaneBlade detachment doing absolutely no damage whatever…

View of attack Ork Bommerz..

Imperial Shrine.

Ork Kult of Speed

Front view of Ork Kult of Speed, the Trukks may look empty but they were carrying Ork Nobz.

Last remaining view of the Ork Kult of Speed before been attacked by Marauder Bombers and an Imperial Recon detachment.

The Imperial Recon detachment which did a lot of damage…

Imperial Leman Russ tank detachment moves up the battlefield.

A close-up of the tanks.

Four Manticores, provided artillery support, until an Ork Orbital Bombardment took two of them out.


Imperial Marauder Bombers fly in low to avoid Ork flak and to provide air support to the Imperial Guard Recon detachment.


Imperial Marauder Bombers fly in low to avoid Ork flak and to provide air support to the Imperial Guard Recon detachment.

Imperial Marauder Bombers fly in low to avoid Ork flak.


The Imperial Guard Recon detachment.

Imperial BaneBlades move forward to protect Imperial industrial assets…

…whilst the Space Marines move forward to protect Imperial spiritual assets.

Imperial Shrine.


End of Turn 2 Morale
Ork Morale: 56
Imperial Morale: 38
Turn Three
At this point things could have gone either way…
Ork Bommerz fly in to attack the Marines.


Ork Great Gargant looks menacingly over the battlefield.

Ork Kult of Speed under artillery attack.


Ork Battlefortresses take quite a bit of damage. As the first Battlefortress was the only one in range it took the three points of damage.

Ork Dread Mob.

Imperial Shrine been defended by Space Marines.

The BaneBlades go onto Overwatch, 24 points of Firepower and armour 6, nasty!

Overview of the battlefield from the Ork position.


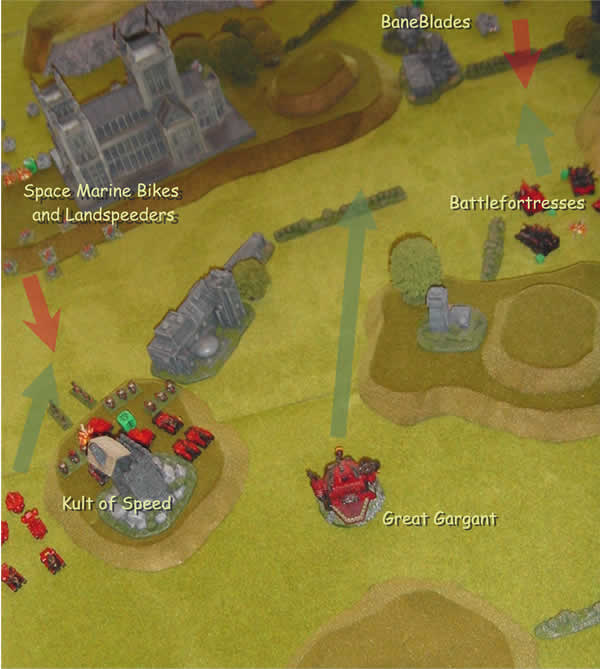
This diagram shows the relative movements of the different Ork and Imperial detachments.
The Ork Kult of Speed under attack from Space Marines.

Battlefortresses prepare to attack BaneBlades.

The Ork Dread Mob “climb” a mountain! The red Dreadnoughts are utilised as Dreadnoughts, the dark ones are Killa Kans.

Space Marine Recon detachment moving in to attack…

The Leman Russ tank detachment move up the battlefield.

The Great Gargant “ignores” the Space Marines so that it can concentrate its fire on the main threat, the Imperial Tank detachments.

Space Marine Recon force.

BaneBlades and Ork Battlefortresses meet in battle.

Overview of the battlefield, in the top left corner you can see the Ork Dread Mob advancing on the enemy. To their left is a Snakebitez detachment. The “blast marker” you can see belongs to the solitary Wartrak of the Kult of Speed which was decimated by the Imperial Guard… On the top right of the picture you can see the Great Gargant and in the centre Ork Battlefortresses moving forward. In the foreground are BaneBlades on Overwatch and the first units of a Leman Russ tank detachment.

Surprisingly (we are talking about Simon here) Imperial Guard on assault orders!!!

Ork Battlefortesses on Assault Orders (see Firepower #1 for War Engine Orders) in the main to avoid been shot at…

End of Turn 3 Morale
Ork Morale: 49
Imperial Morale: 40
Turn Four
Time for more flyers…
Marauders fly in to attack the Great Gargant and are intercepted by a squadron of Ork Bommerz.

The Ork Bommerz were quite successful and forced down two Maurauders though the others flew in and caused no damage. This was also one of those “mistakes” as the Marauders did not get a chance to shoot back at the Ork Bommerz during the intercept

Ork Great Gargant goes on Assault Orders (see Firepower #1 for War Engine Orders) in the main to avoid been shot at…

Marauders fly in to attack the Great Gargant and are intercepted by a squadron of Ork Bommerz. The Ork Bommerz were quite successful and forced down two Maurauders though the others flew in and caused no damage. This was also one of those “mistakes” as the Marauders did not get a chance to shoot back at the Ork Bommerz during the intercept.

The Ork Battlefortresses destroyed by the Imperial BaneBlades and are ablaze, the Orks inside bale out and head for cover just in case they explode…

The Space Marine Recon Detachment suffers numerous attacks whilst on assault orders against the Orks.

The Ork Battlefortresses destroyed by the Imperial BaneBlades and are ablaze, the Orks inside bale out and head for cover just in case they explode… however under attack from BaneBlades and Leman Russ tanks which virtually destroy the detachment.

End of Turn 4 Morale
Ork Morale: 20
Imperial Morale: 31
Turn Five
Though technically the end of the game (using a revised Morale system), we decided to play one more turn to see if we could get either one of us down to zero…
As you can see from this shot after the Battlefortresses are removed and following the shooting phase there was nothing left of the Ork Infantry detachment apart from the odd stand of Nobz. They had been shot at by the Leman Russ detachment and the BaneBlades. In the top left corner you can see the remains of the Imperial Guard Supreme Commander who was shot to bitz by the Orks and they lost all their Chimera transports. The Great Gargant was ready and waiting to strike when the Boyz lost so much morale it was game over…

Another shot of the remains of the battlefield.

Still waiting to fight were a Snakebitez detachment of BoarBoyz and Squiggoths.

BoarBoyz and Squiggoths on assault orders…

…facing them though was a detachment of Leman Russ tanks on Overwatch!

…and three slightly damaged BaneBlades!!!

An Ork artillery detachmemt was waiting at the back, note the Ork Trukks with Krooz Missulz and the Ork Trukk with Heavy Siege Artillery.

This Kult of Speed was ready to assault the Space Marine Recon detachment, but alas time was against them and the Ork Morale was too low. The nice castle building is Snapdragon and is sadly now OOP but also works nicely with Warmaster figures.

Rear view of the Snakebitez detachment of BoarBoyz and Squiggoths.

Imperial forces ready and willing to advance on the remaining Orks…

…and cleanse the Imperial Shrine of the taint of the Orkish Great Gargant.

End of Game Morale
Ork Morale: 9
Imperial Morale: 19
As the Imperium had started with only 2000 points and the Orks 3000 points, the Orks would have won if they had managed to reduce the Imperial Morale to 0, but as their morale dropped to below 10 this was an Imperial victory.